 |
Initial System
Administration
|
This section assumes that you have successfully completed the software
installation or upgrade process.
Accessing the system
Once the software is installed, you can access the system administration
in either of two ways:
- From the console with the Netscape browser
- From any computer that has LAN access and a browser
Log in to the system from the console
- At the console, log in as craft (or sa if you are the system administrator)
with the default password.
- As soon as you log in, the system displays the Netscape browser
with the Administration Main Menu.
If you have logged in as TSC, rather than craft or sa, type webadmin
and press Enter to display the web-based administration pages.
Access the web-based administration pages from a remote machine
- From a separate system, use your favorite browser and enter the
address: http://hostname.dr.avaya.com where hostname is the name of
the INTUITY machine.
- Use the craft login (or sa if you are the system administrator)
with the default password.
- If you do not see the login page that asks for Login and Password,
then make sure you have properly typed in the machine name.
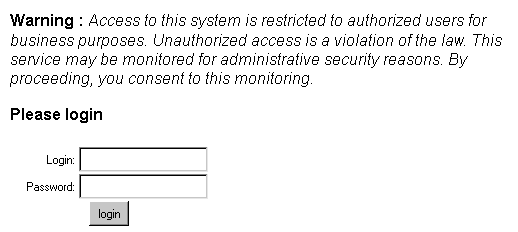
As soon as you log in, the system displays the Administration Main
Menu in your browser.
Administering Basic Channel and Number Settings
Many of the settings in this system come from switch integration configuration
notes or from the switch integration worksheet. Start at the web-based
administration login page and log in as craft.
Call Transfer Administration
- From the web-based Administration Main Menu, select:
Voice System Administration
     Call Transfer Administration
          Add Allowed Numbers
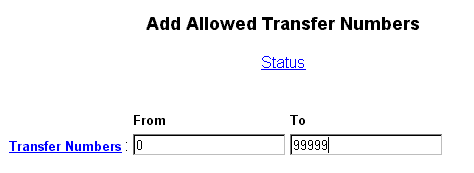
- Make the From and To settings, as specified by the customer and
as described in the system online help.
- Click Save.
The system displays a confirmation message.
Voice Equipment Administration with Switch Integration
- From the web-based Administration Main Menu, select:
Voice System Administration
     Voice Equipment Administration
          PBX Extensions to Channels
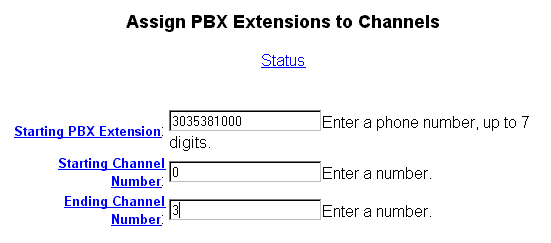
- Make the following field settings, as specified by the customer
and as shown on the example screen.
| Field |
Setting |
| Starting PBX Extension |
enter the phone number for the first channel |
| Starting Channel Number |
0 - start at channel 0 |
| Ending Channel Number |
3 - enter the last channel number (on a 4-port
system the number is 3, on an 8-port system the number is 7) |
- Click Save.
The system displays a confirmation message.
- From the web-based Administration Main Menu, select:
Voice System Administration
     Voice Equipment Administration
          Services to Channels
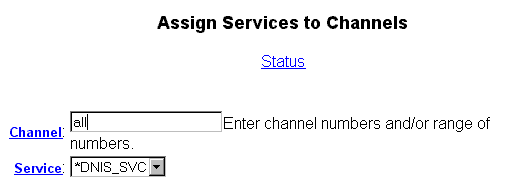
- Make the following field settings, as shown on the example screen.
| Field |
Setting |
| Channel Numbers |
all |
| Service Name |
*DNIS_SVC |
- Click Save.
The system displays a confirmation message.
- From the web-based Administration Main Menu, select:
Voice System Administration
     Number Services Administration
          Assign Service
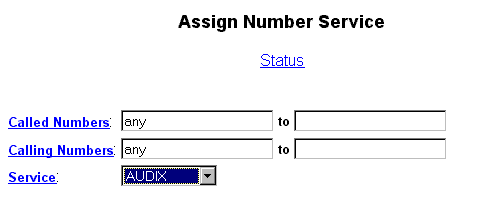
- Make the following field settings, as shown on the example screen.
| Field |
Setting |
| Called Numbers |
any to - the field after the "to"
is blank |
| Calling Numbers |
any to - the field after the "to"
is blank |
| Service Name |
AUDIX |
- Click Save.
The system displays a confirmation message.
- From the web-based Administration Main Menu, select:
Voice System Administration
     Voice Equipment Administration
          State of Voice Equipment
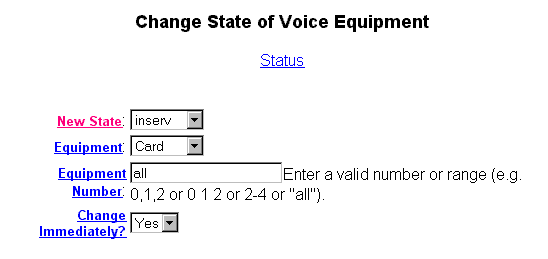
- Make the following field settings, as shown on the example screen.
| Field |
Setting |
| New State |
inserv |
| Equipment |
card |
| Equipment Number |
all |
| Change Immediately? |
Yes |
- Click Save.
The system displays a confirmation message.
- From the web-based Administration Main Menu, select:
Diagnostics
     Voice Equipment Diagnostics
          Display
- Verify that you have all of the information that you entered and
that the state of the voice card is Inserv.
- If the state of the voice card is FOOS rather than Inserv, perform
the following steps:
- From the web-based Administration Main Menu, select Diagnostics,
Voice Equipment Diagnostics, Display.
- Look for any channels in the state of FOOS. If there are none,
continue onto the next section.
- If there are channels in the state of FOOS, go to Diagnostics,
Voice Equipment Diagnostics, Diagnose.
- Complete the Diagnostics page:
| Field |
Setting |
| Equipment to Diagnose |
card |
| Equipment Number |
all |
| Immediate Diagnosis? |
yes |
- Click Diagnose.
- Wait a few minutes while the system fixes any of the FOOS channels.
- Click Back, then click Display. All channels should now be Inserv.
If one or more channels remain as FOOS, there is a phone line
problem.
Administering Message Core
Installation worksheets or customer input may be required for many
of the Message Core settings.
Overview
To access the Messaging Administration screens:
- From the web-based Administration Main Menu, select:
Global Administration
     Messaging Administration
The system displays the Command Prompt screen and the SSH dialog
box. The SSH dialog box provides security protection for the Command
Prompt screen.
- Type your login and password, then click OK. If
you are prompted for a terminal type, type vt100.
Note that from the terminal the functions keys do not always work.
Here are the key sequences for the function keys in that case.
Key Sequences
| Function |
Key Sequence |
Function Key |
Cancel
|
Ctrl+X |
F1 |
| Refresh |
Ctrl+L |
F2 |
| Enter |
Ctrl+E |
F3 |
| ClrFld |
Ctrl+K |
F4 |
| Help |
Ctrl+W |
F5 |
| Choices |
Ctrl+C |
F6 |
| NextPg |
Ctrl+N |
F7 |
| PrevPg |
Ctrl+P |
F8 |
Other Helpful Key Sequences
| Function |
Key Sequence |
Back space
|
Ctrl+H |
| Next Field |
Ctrl+M |
| Break out of the webadmin interface and return
to the Linux prompt |
Ctrl+Alt+Backspace |
Basic Administration
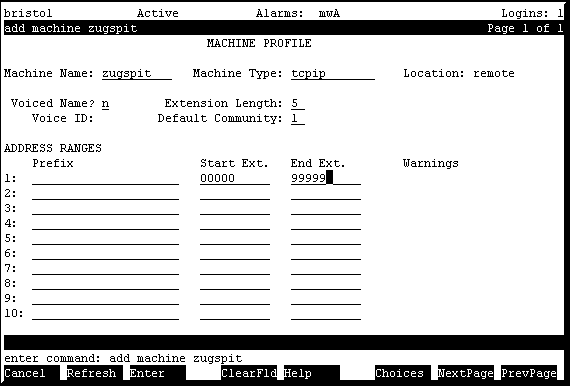
Set the Machine Profile for the local INTUITY AUDIX LX machine:
- At the AUDIX command prompt, type change machine and press
Enter.
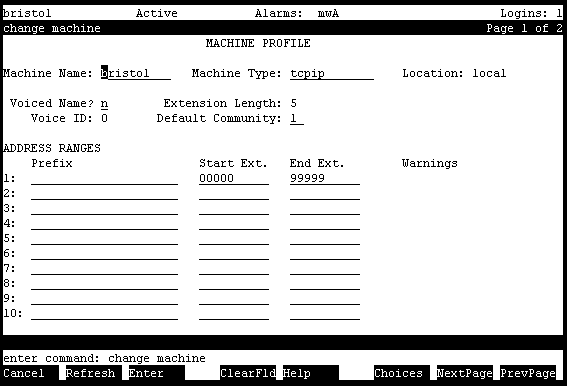
- Make the following field settings, as shown on the example screen,
and then press F3 (Enter).
| Field |
Setting |
| Machine Name |
change from "local" to the hostname
of your machine |
| Start Ext |
00000 This assumes you have a five-digit
dial plan. If you have a 4 digit dial plan enter 0000 and 9999. |
| End Ext |
99999 |
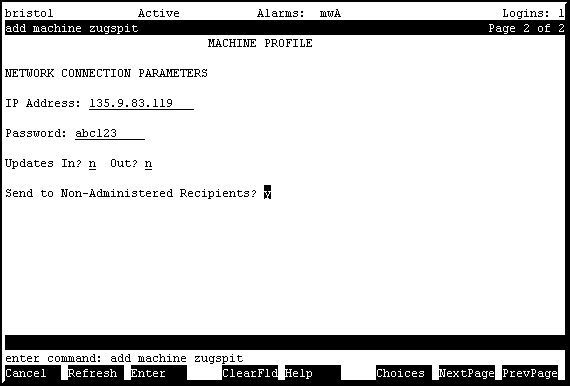
The system displays the Machine Profile, page 2.
- Type a Password to be used for networking, but do not change other
fields on this screen. Leave Updates In and Out set to N.
- Press F3 (Enter).
- At the AUDIX command prompt, type change system-parameters outcalling
and press ENTER.
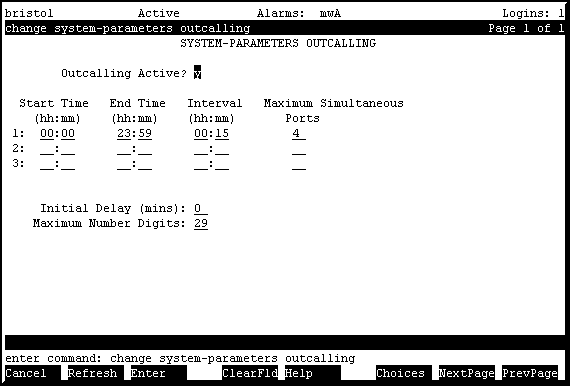
- Make the following field settings, as shown on the example screen,
and then press F3 (Enter).
| Field |
Setting |
| Outcalling Active? |
y (or as specified by the customer) |
- At the AUDIX command prompt, type change system-parameters fax-options.
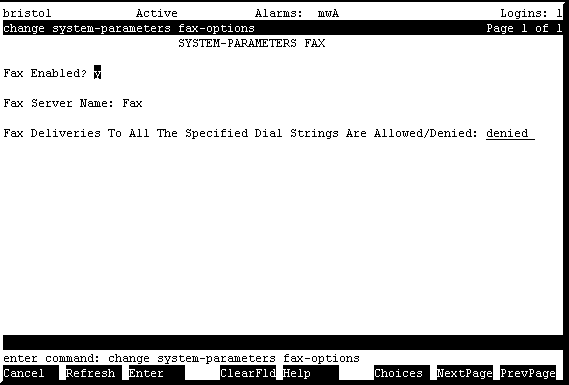
- Make the following field settings, as shown on the example screen,
and then press F3 (Enter).
| Field |
Setting |
| Fax Deliveries To All The Specified Dial
Strings Are Allowed/Denied |
denied
This is customer preference. See FAX
Messaging and the following table to understand how fax
dialing is allowed or denied.
Setting this field as "denied" does allow fax to
work. If you select "allowed" instead, then you
must use the add fax-dial-string command. The fax dial
string is a list of the leading digits of the phone number
that users can send a fax to.
|
|
Subscribers Can Send or Print Faxes
To:
|
|
|
|
Any telephone number
|
Denied
|
Do not specify any dial strings.
|
|
Any telephone numbers except for ones
you want to deny access
|
Denied
|
Specify dial strings that begin telephone
numbers that subscribers cannot use.
|
|
Only specific telephone numbers
|
Allowed
|
Specify only the dial strings that begin
telephone numbers that subscribers can use for sending
or printing faxes.
|
- If you are using OverLAN switch integration, change the System Parameters
Features form. If you are not using OverLAN, skip 3 steps to the next
command.
- At the AUDIX command prompt, enter change system-parameters features.
Press F7 (NextPage) twice to view page 3 of the form.
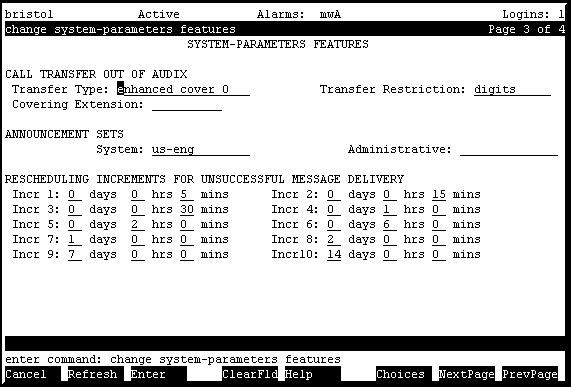
- Make the following field settings, as shown on the example screen,
and then press F3 (Enter).
| Field |
Setting |
| Transfer Type |
enhanced_cover_0 (or as specified by the customer)
Note: Transfers do not work using the InBand Integration,
so do not enable it.
|
| Transfer Restriction |
digits
Note: You can only make this setting with
a tsc login. Contact the support center for assistance.
|
The system displays the message:
System Covering Extension Not Assigned. Press
[ENTER] to Confirm.
- Press F3 (Enter).
- At the AUDIX command prompt, enter change cos 0.
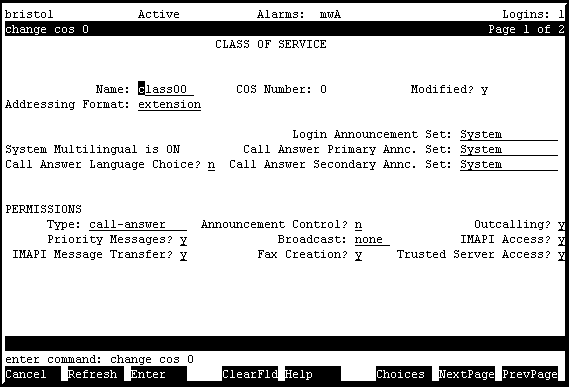
- Make the following field settings, as shown on the example screen,
and then press F3 (Enter).
| Field |
Setting |
| Outcalling? |
y (or as specified by the customer)
|
- Repeat the steps for COS 1.
- If the system is using digital networking, do the following:
- At the AUDIX command prompt, enter change system-parameters
limits.
- Change the Administered Remote Users setting to 10000.
- Press F3 (Enter) to save.
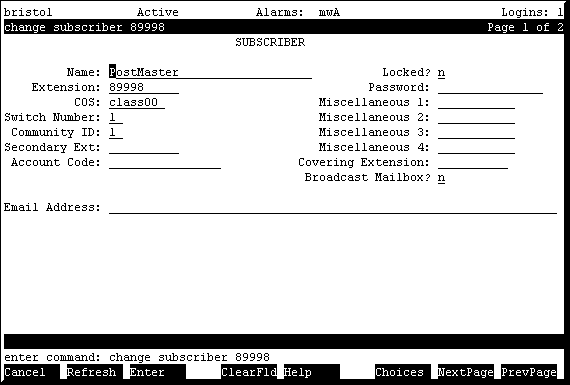
- Create a test subscriber by starting at the AUDIX command prompt,
and entering add subscriber.
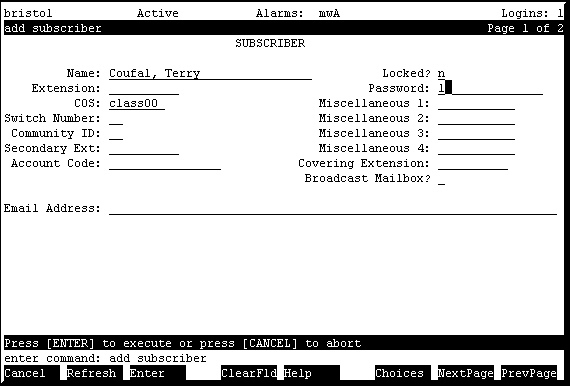
- Make the following field settings, as shown on the example screen,
and then press F3 (Enter).
| Field |
Setting |
| Password |
1 |
| COS |
class00
|
- Repeat for additional test subscribers. Create at least one or two
subscribers for initial acceptance testing.
You can add subscriber information from an existing system in the
following ways:
- At the AUDIX command prompt, exit AUDIX Administration by typing
exit and pressing Enter.
The screen displays the message "Connection closed."
Digital Networking
To allow digital networking, you make settings for the local and remote
machine on the Inuity AUDIX LX and on the target machine. You already
completed the local machine settings with the change machine command.
To set information for the remote machine (the one you want to network
to):
- Enter change machine machine-name at the command prompt,
where machine-name is the name of the remote system.
The system displays the Change Machine screen for the remote system.
- Set the Machine Name, Machine Type, Extension Length, Start Extension,
and End Extension.
- Press F7 (NextPage).
- On Machine Profile, page 2, set the IP Address of the remote machine.
- In the Password field, set the networking password for the remote
machine.
- For now, do not allow Updates In or Out. Both fields should be set
to N.
- Press F3 (Enter).
- Perform required set-up steps on the remote system.
- For additional information about networking, check the documentation
for the other system and the Networking procedures on the INTUITY
AUDIX LX documentation CD.
Administer Internet Messaging
Plan to make these changes to activate Internet Messaging before load
is running or when usage is low.
- From the web-based Administration Main Menu, select:
Global Administration
     Messaging Administration
The system displays the Command Prompt screen and the SSH dialog
box. The SSH dialog box provides security protection for the Command
Prompt screen.
- Type your login and password, then click OK.
- Type add subscriber and press Enter.
- On the Subscriber screen, make the following settings:
- Name: PostMaster
- Extension: 89998 is suggested, but any valid extension is acceptable.
- Note the PostMaster extension.
- Press F3 (Enter) to save the subscriber information.
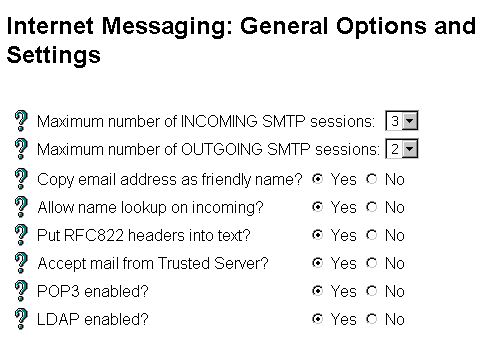
- From the web-based Administration Main Menu, select:
Feature Administration
     Internet Messaging
          General Options and Settings
- Click on the Yes radio buttons to enable Pop 3 and LDAP.
- Click Submit to save the changes, then click Next.
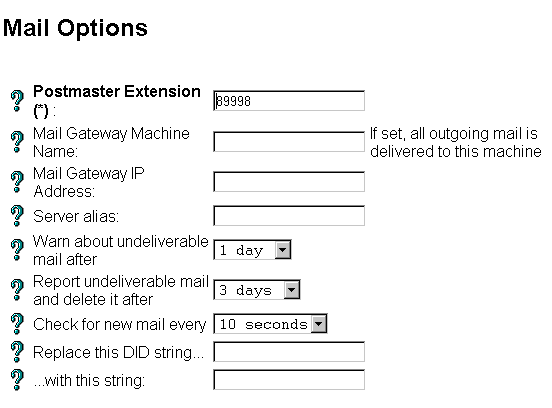
- On the Mail Options page, locate the Postmaster Extension box. Type
the extension you just added for the Postmaster.
- Click Submit.
- Click Next to display the Mail Options page.
- Verify that the Postmaster Extension matches the subscriber you
set up for the Internet Messaging Postmaster.
- Inform system users that Internet Messaging is available and tell
them how to use it:
- To send a message from a user on the INTUITY AUDIX, use Message
Manager. Address the message by using the email address. For example:
[email protected].
- To send a message to a user on the INTUITY AUDIX from any email
program and server, use [email protected]. For example: [email protected]
is the address created by [email protected]. When you add
subscribers to the system, INTUITY AUDIX creates email addresses for
them based on their name: [email protected].
Additional information and a sample announcement are included on
the INTUITY AUDIX LX Documentation CD.
Administering LDAP on Netscape
Customers using Netscape Communicator's Address Book to
do LDAP Directory lookups should do the following:
- Start Communicator.
- Click Communicator on the top menu bar.
- Click Address Book.
- In Address Book select File then New Directory.
- Add INTUITY Server as a new Directory.
- Change system to your system name.
- Make the following field settings:
- Description: system
- LDAP Server: system.dr.avaya.com
- Search Root: dc=messaging
- All other fields default values
Additional information is included on the INTUITY AUDIX LX Documentation
CD.
Top of page
|
