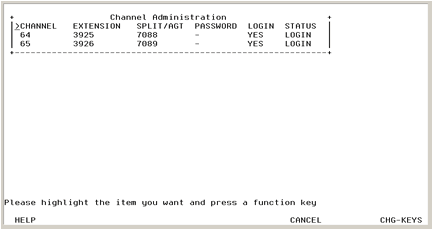

Channel Administration maps the voice system channels to the DEFINITY switch extension numbers. The Channel Administration window displays one entry for each telephony channel (voice system agent) that is a member of the voice system automatic call distributor (ACD) split.
Use the Channel Administration window to do the tasks described in the following table:
Task |
Description |
Add an ASAI channel |
Assigns telephony channel as a voice system agent |
Change an ASAI channel |
Changes the switch extension assigned to a telephony channel |
Remove an ASAI channel |
Unassigns a telephony channel as a voice system agent |
Log in an ASAI channel |
Logs in a channel as an agent of the ACD split, enabling the channel to receive calls from the ACD |
Log out an ASAI channel |
Unassigns a channel from the ACD split, and prevents the ACD from delivering calls to it |
Accessing the Channel Administration window
To access the Channel Administration window:
![]()
The system displays the Channel Administration window.

The following table describes the information on this screen:
Column Name |
Description |
CHANNEL |
Telephony channel number on the voice system |
EXTENSION |
Switch extension number assigned for the channel |
SPLIT/AGT |
DEFINITY switch login number, either ACD extensions or Agent IDs. Maximum length of 9 characters. If the channel is an ACD split extension, the number represents the split number. If the channel is an Agent ID in an expert agent select (EAS) environment, the number represents the Agent ID. |
PASSWORD |
Password for the Agent ID. Channel password must match the password for the corresponding Agent ID. Maximum length of 9 characters. Dash indicates no channel password used. |
LOGIN |
Yes represents channel login for ACD split. If No, ACD does not deliver any calls to this channel. |
STATUS |
Channel maintenance state, shown as one of the following:
|
Adding a channel entry
To add a channel entry:
The system displays the alternate function keys.
The system displays the Add A Channel Entry window.
The system adds the new agent line and returns to the Channel Administration window.
Changing a channel entry
The channel must be logged out before you can change it. If the channel is not logged out, complete the procedure in "Logging Out a Channel" below.
To change the switch extension associated with a channel:
The system displays the alternate set of function keys.
The system displays the Change A Channel Entry Window.

Note:
The new extension number must be unique.
The system changes the switch extension of the selected channel and returns to the Channel Administration window.
Removing a channel entry
The channel must be logged out before you can remove it. If the channel is not logged out, complete the procedure in "Logging Out a Channel" below.
To remove a channel entry:
The system displays the alternate function keys.
The system displays a confirmation screen asking you if you want to remove the selected item.
The system unassigns the selected channel and returns to the Channel Administration window.
Logging In a channel
Once the telephony channels are logged in, no manual intervention is required to log the channels back in during recovery (for example, rebooting the switch or voice system) or upon restarting the voice system.
To log in a channel:
The system displays the alternate set of function keys.
The system logs in the selected channel to the ACD and returns to the Channel Administration window.
Logging Out a Channel
To log out a channel:
The system displays the alternate set of function keys.
The system unassigns the selected channel from the ACD and returns to the Channel Administration window.