Avaya™ Modular Messaging Help
|
Avaya™ Modular Messaging Help |
|
| Home > MAS Administration > Custom Prompts > Working with Visual Voice Editor |

|
Working with Visual Voice Editor |
You use Visual Voice Editor to customize the prompts used by the automated attendant to greet callers to your organization. This section describes how to start Visual Voice Editor, and provides an overview of Visual Voice Editor screen areas and controls.
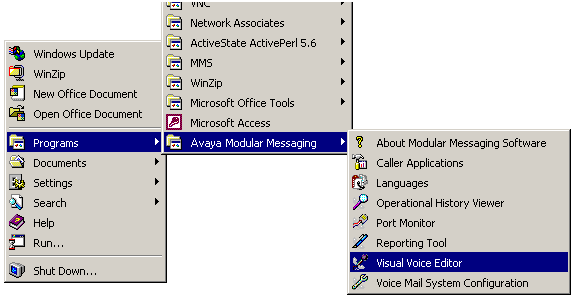
Run Visual Voice Editor from the Avaya Unified Messenger folder.
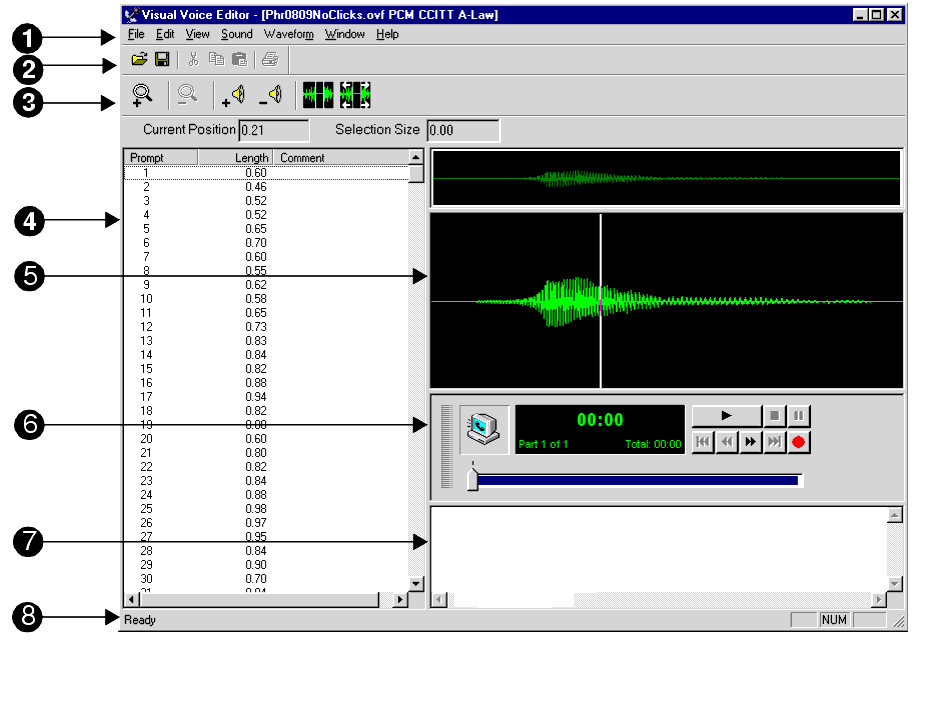
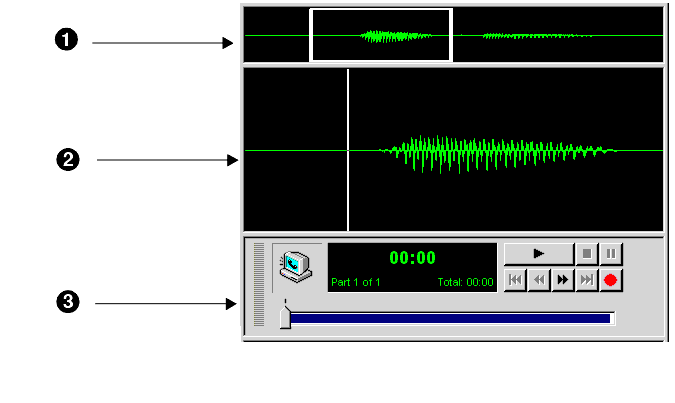
Read this section to familiarize yourself with the Visual Voice Editor screen areas and controls. The following figure shows the Visual Voice Editor main window.
|
1 Main Toolbar
2 Waveform Toolbar
3 Waveform Infobar
4 Prompt View
|
5 Waveform View
6 Voice Player
7 Comment View
8 Status Bar
|
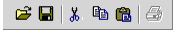
Provides standard file management options.
From left to right the options are Open prompt file, Save prompt file, Cut selection, Copy selection, Paste clipboard contents, Print prompt list.
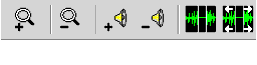
Provides options for performing operations on audio data in the Waveform view
From left to right the options are Zoom in, Zoom out, Increase amplitude after recording, Decrease amplitude after recording, Force to silence, Insert silence. Use the View menu to display or hide the Waveform toolbar as required.
Provides information about the current edit position and the size of the Detailed Waveform current selection, in seconds. Use the Waveform Infobar to guide you when selecting a section of a prompt to edit
Use this view to select a prompt to work with. It lists all the prompts that are stored in the prompt file in three columns showing the prompt number (Prompt), the duration of prompt playback in seconds (Length), and a textual description of the prompt (Comment).
| Note: Click the Print button on the main toolbar to print the prompt list. This is available in Prompt view only. |
Use this view to edit audio data. The currently selected prompt is graphically represented as a waveform.
This shows the entire recording. A white frame indicates the extent of the recording in the Detailed waveform view. Once zooming is applied to the view, you can drag the frame to move around the recording.
This allows precise editing of audio data. A white vertical bar indicates the current edit point. Use the mouse or keyboard to select audio data in a similar way to selecting text in a word processor.
This allows playing, pausing, recording, fast forwarding, and rewinding of a recording using standard CD player controls. It shows the length of the recording in seconds and indicates the current audio device, that is telephone or local multimedia.
Use this view to enter or edit prompt text. Contains a textual description of the currently selected prompt.
The Status Bar provides useful information, for example, about toolbar buttons and progress during an operation. Use the Status Bar command on the View menu to toggle between displaying or hiding the status bar.
|
|