Avaya

Modular Messaging Help

 Getting Started 
 Installation 
 Administration 
 Maintenance 
 Reference 
Home > MAS Administration > MAS - Configuring the Offline Message Store Folder

MAS - Configuring the Offline Message Store Folder

Before you can configure Offline Access, you must create a local offline message store folder on each MAS in the voice mail domain. If you have a multi-MAS voice mail domain, you must also create a remote offline message store folder on the file server. For more information about Offline Access, see MAS - Understanding Offline Access.

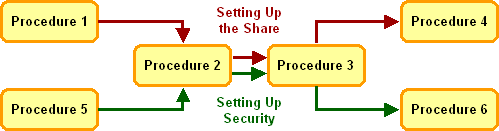
You must set each offline message store folder as a shared folder and configure the permissions. To set up the share, follow Procedures 1, 2, 3 and 4; to set up security, follow Procedures 5, 2, 3 and 6.


Procedure 1: Sharing the Offline Message Store Folder

  1. Locate the offline message store folder in Windows Explorer.
  2. Select the folder and right-click to open the Properties window.
  3. Select the Sharing tab.
  4. Select the Share this folder option button. This activates the controls within the group box.
  5. Click the Permissions button. This launches the Permissions dialog box.
  6. Click the Add... button under Groups or user names. This launches the Select Users, Computers, or Groups window.
  7. Follow “Procedure 2”, “Procedure 3”, and “Procedure 4”, below.

Procedure 2: Adding the Appropriate Modular Messaging Logon Service Groups

  1. In the Select Users, Computers, or Groups dialog box, Enter the object names to select field, enter the name of the service group, such as MM Service Permissions. This is the service group you selected, when installing Modular Messaging.
  2. Click the Check Names button to verify the name. The name is then underlined. If you don’t know the correct name, just type in the first letter and the Check Names button allows you to pick from a list.
  3. Click OK to return to the Permissions window. You will see that the service group is now listed under Group or user names.
  4. You can repeat this task to add other logon accounts, if required. You can build up a list of names in the Enter the object names to select field, separated by semi-colons (;).
    • Local administration service group, such as Domain Admins, for this MAS.
    • Customer administration service group.
    • Support group remote access service group.

Procedure 3: Adding Local Service Groups for each MAS that Handles Calls

  1. In the Select Users, Computers, or Groups dialog box, click the Object Types button. This launches the Object Types window.
  2. Ensure the Computers check box is selected and click OK to return to the Select Users, Computers, or Groups window.
  3. In the Enter the object names to select field enter the name of the computer, such as ARIA-VS.
    Note: Only MASs that handle calls must access the offline share folder.
  4. Click the Check Names button to verify the name. The name is then underlined. If you don’t know the correct name, just type in the first letter and the Check Names button allows you to pick from a list.
  5. You should repeat this procedure for each MAS that handles calls. You can build up a list of names in the Enter the object names to select field, separated by semi-colons (;).
    Note: The MAS must have joined the Windows domain before the system can add the service group for that server. You never need to add the service group for the supplementary tracing server. Even if the supplementary tracing server hosts the offline store, the server handles no messages and does not require access.

Procedure 4: Setting the Share Permissions for the Service Groups

  1. Click OK in the Select Users, Computers, or Groups dialog box to return to the Permissions dialog box.
  2. You will see the logon service groups and the service groups for the selected MASs are now listed under Group or user names.

  3. Select the first service group in the Group of user names list.
  4. Click the Allow check box for these permissions: Change and Read.
  5. Repeat this procedure for each service group that you added.
    Note: You should ensure that the Everyone group has the Change and Read permissions.
  6. Click OK to return to the Properties dialog box, Sharing tab and click OK. The share and permissions are now configured.

Procedure 5: Setting Security for the Offline Message Store Folder

  1. Locate the offline message store folder in Windows Explorer.
  2. Select the folder and right-click to open the Properties window.
  3. In the Properties dialog box, select the Security tab.
  4. If there is an Everyone account listed under Group or user names, select it and click the Remove button.
  5. Click the Add... button. This launches the Select Users, Computers, or Groups dialog box.
  6. Follow “Procedure 2” and “Procedure 3”, above, then “Procedure 6”, below.

Procedure 6: Setting the Security Permissions for the Service Groups

  1. Click OK in the Select Users, Computers, or Groups dialog box to return to the Properties dialog box, Security tab.
  2. You will see the logon service groups and the service groups for the selected MASs and is now listed under Group or user names.

  3. Select the first service group in the Group of user names list.
  4. Click the Allow check box for these permissions: Modify, Read & Execute, List Folder Contents, Read and Write.
  5. Repeat this procedure for each service group that you added.
  6. Click OK. The security and permissions are now configured.

Top of page