Modular Messaging Help
|
Modular Messaging Help |
|
| Home > MAS Administration > Example 3: Automated fax attendant |

|
Example 3: Automated fax attendant |
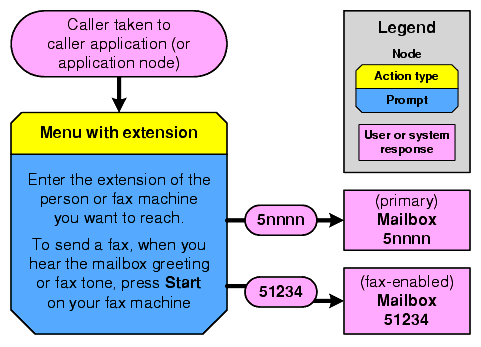
This example has been created to illustrate how you can use a caller application to act as an auto attendant for relaying faxes to a subscriber’s fax-enabled extension.
The advantage of this arrangement is that you can provide fax delivery for your subscribers without paying for additional Direct Inward Dialing (DID) lines or personal trunks for fax extensions. The disadvantage is that incoming calls cannot be automatically dialed, because the caller must enter touch tones to select from the caller application menu and then press the start key on the fax machine to begin transmitting the fax.
Essentially, when you set up an automated fax attendant, you are simply transferring the caller to a fax-enabled mailbox (which is set up using the Subscriber page). To send the fax, the caller needs to know only the pilot number of the Avaya Modular Messaging system and the fax-enabled mailbox number. Upon reaching the caller application (or application node) that will transfer them to the fax-enabled mailbox, callers hear a prompt instructing them to press the extension number and then press the start button on their fax machines after they hear the mailbox greeting to start or the fax tone (if no greeting is being used in the mailbox).
The subscriber must provide fax senders the system number to call (in this case, it might be xx3-7001) and the subscriber's fax-enabled mailbox number (in this case, 51234).
The following is a possible call flow for this caller application. Note that this need not necessarily be an entire application by itself. In fact, it will more likely be used to best effect by simply creating an application node within an application (for instance, it could be used as an additional option in Example 1: Alternative “Auto Attendant” Main Menu). Also, the prompt does not need to be contained within the caller application; it could just as easily be created within the fax-enabled mailbox, as a greeting. (If the target mailbox is dedicated for fax only, then it might be better to place the instruction prompt within the mailbox. However, if the mailbox is also used for voice mail—as it will in most cases—then it might be better to place the instruction prompt within the caller application, as planned here.)
The following table presents a step-by-step method for building the caller application. It assumes that you have already started the Caller Applications Editor and that you are creating this as a separate caller application, though it could be easily modified to treat as an application node within a caller application. The Action(s) column gives a description of the step in the process, and the Location of procedure(s) column provides a link to the detailed procedure in the documentation that tells how to perform the step.
|
|