Downloading Firmware to Port Circuit Packs
You can download new firmware to one or more circuit packs that have the "P" suffix within the same system. This feature eliminates having to physically remove the circuit pack and sending it to the factory for a firmware update.
| Caution! |
The accuracy of the information provided in this section is dependent on several factors, including the:
|
During this process, a Web-downloaded firmware image (residing on a local server) is either:
- For a "
self-download", copied (uploaded) onto a "
source" circuit pack
- For a "
remote download", copied (uploaded) through a "
source" C-LAN circuit pack to a "
target" circuit pack
using the File Transfer Protocol (FTP). The image is then copied to FLASH memory.
Downloadable Circuit Packs
Although different circuit packs have different potential roles in a firmware download, the following circuit packs (with these or higher suffixes) can participate in a firmware-download procedure:
- Control LAN (C-LAN) - TN799C or TN799DP
| Note: |
Although a TN799C C-LAN circuit pack can participate as the "source" of a download to various "target" circuit packs, this board cannot be a final recipient of downloaded firmware.
|
- 2-Wire Digital Line (DIG-LINE) - TN2214CP or TN2224CP
- IP Media Processor (IPMEDPRO) - TN2302AP
- IP Server Interface (IPSI) - TN2312AP
- Maintenance/Test (M/T-ANL) - TN771DP
- UDS1 - TN464GP, TN2464BP, and TN2313AP
- Voice Announcements over LAN (VAL) - TN2501AP
| Circuit pack roles in Firmware Downloads
|
| Circuit Pack |
TN Code |
Role in
Self-Download |
Role in
Remote Download |
| C-LAN |
TN799C |
N/A |
|
|
|
TN799DP |
|
Source |
| DIG-LINE (2-wire) |
TN2214CP |
N/A |
|
|
|
TN2224CP |
N/A |
Target |
| IPMEDPRO |
TN2302AP |
N/A |
Target |
| Maintenance/Test |
TN771DP |
N/A |
Target |
| UDS1 |
TN464GP |
N/A |
Target |
|
|
TN2464BP |
N/A |
Target |
|
|
TN2313AP |
N/A |
Target |
| VAL |
TN2501AP |
Source |
N/A |
|
1 A "source" circuit pack in a remote download uploads firmware to 1 - 50 like "target" circuit packs. 2 A "source" circuit pack in a self-download can only upload firmware to its own flash memory. 3 A "target" circuit pack in a remote download receives firmware from a C-LAN remote "source" circuit pack. |

The table below shows the high-level processes outlined in this document.
| Contents of this document
|
| Step |
Action |
No. of circuit packs |
Description |
-
|
|
All |
Gathering information, downloading new firmware image file from Website. |
-
|
Choose either:
or
|
Single
Multiple
(same type)
|
- Copying a new firmware image file onto a source circuit pack using the File Transfer Protocol (FTP)
- Replacing the old firmware image file in FLASH memory with the new file
- Copying a new firmware image file onto a source C-LAN circuit pack using the File Transfer Protocol (FTP)
- Copying the image to the target circuit pack(s)
- Replacing the old firmware image file in FLASH memory with the new file
|
-
|
If you have any trouble with the procedure, refer to Troubleshooting firmware downloads.
|
All
|
|
|

Preparing to update firmware
The following sections contain preparatory information to assist with the successful completion of firmware downloads to port circuit packs. These sections are:
Verify hardware/software requirements
The following items and procedures are needed to download firmware to the appropriate circuit packs:
- Use an appropriate procedure and source circuit pack to download firmware to the following target circuit packs.
Hardware/software requirements
The following items are needed to download firmware to the appropriate circuit packs:
DEFINITY ECS
- Use the DEFINITY ECS hardware with the system software releases:
| Download procedure by circuit pack
|
| Source circuit pack |
Download method |
Target circuit pack |
| TN799C (C-LAN) |
|
DIG-LINE, UDS1, IPMEDPRO, or Maintenance/Test |
| TN799DP (C-LAN) |
|
The TN799DP or TN2312AP itself
DIG-LINE, UDS1, IPMEDPRO, or Maintenance/Test |
| TN2501AP (VAL) |
|
The TN2501AP itself |
|

- A source circuit pack with an Ethernet data module administered to one of its ports
- Target port circuit packs with a "P" suffix
- Services login and password
- Clear channel between the source (C-LAN) and target board (for downloads to remote PNs only)
PC or other server
- IP connectivity to the source board
- IP connectivity to the World-Wide Web
- File transfer protocol (FTP) software program
| Note: |
Some GUI-based FTP applications are incompatible with MultiVantage. Command-line FTP applications launched from a UNIX shell or DOS prompt work best.
|
- Web browser (Netscape 4.5 or Internet Explorer 5 or higher)
Download image to local staging area
For a download from the Web, you need a temporary staging area to store the firmware images before uploading them to the source circuit pack. Although this download is normally done from a PC, you can also use other server types, such as UNIX.
- Go to the Avaya Customer Support Web site (
http://support.avaya.com).
- Select the
Online Services link near the top left of the page.
- Select
Software/Firmware Downloads.
A page with a large table appears.
- Find and click on the following table entry:
| Grouping |
Produce Name |
Document Title |
| Communication Systems |
Definity Enterprise Communication Server (ECS) |
Avaya Media Server and Media Gateway |
|

The main MultiVantage Firmware Download page appears.
- Select the circuit pack you want to upgrade, then the firmware images that you need (there may be more than one, depending on the circuit pack).
For example, the
tn2501ap_f05.bin filename is for the TN2501AP (VAL) circuit pack.
- Download the file to the directory where you will launch the FTP application.
Pre-upload checks
At the SAT:
- Type
change permissions
<login>
and press
Enter
.
Ensure that the
Administer Features
field is
y
on the Command Permissions Categories screen.
- Get the source circuit pack's IP address either from the data systems administrator or by typing the following SAT commands:
- If you know the circuit pack address, type
list configuration board
<UUCSS> and press
Enter.
If you do not know the circuit pack address, type
list configuration all and press
Enter.
Check that these ports are enabled:
- Port 17 (C-LAN)
- Port 33 (VAL)
- Type
display port
<UUCSSpp> and press
Enter to obtain the data module ID, where
pp is the port number.
- Type
display data-module
<ID>
and press
Enter to obtain the link number.
- Type
status link
<link_number> and press
Enter to check the link status and obtain the source IP address.
- If this is a remote download, continue with Remote download.
If not, continue with the following section.
Self-download
During this procedure, you will use an FTP client to copy the new firmware image file to a circuit pack. Then you will copy the new image to the FLASH memory on the pack. This procedure updates
only a single circuit pack and applies to these circuit packs:
- Control LAN (C-LAN) (TN799DP)
- Voice Announcements over LAN (VAL) (TN2501AP)
Set up file system
Before you can upload staged files to the source circuit pack, you must set up a file system on the circuit pack to accept the files.
- Log onto the switch using superuser or services login and password.
- Type
enable filesystem board
<UUCSS>
login
<ftplogin> <ftppassword> [size actual_size], where
-
ftplogin is any temporary login for this FTP session, for example,
denver.
-
ftppassword is any temporary login for this FTP session, for example,
broncos.
Later, you will use this same
ftplogin and
ftppassword in the following section, FTP the new firmware image file.
| Note: |
The optional
size
actual_size qualifier only works with TN799C (C-LAN). It allows you to specify a
smaller file-system size than the default 1-MB block (maximum) allocated.
If the source circuit pack has insufficient memory, delete old files (
remove file
board
UUCSS filename), or wait until there is less traffic on the board.
|
| Caution! |
Unless the
Remove
Image
File
After
Successful
Download
field is set to
y
, the ftplogin and ftppassword remain on the TN799DP (C-LAN) and TN2501AP (VAL) circuit packs either until they are reset or until you issue the
disable filesystem board UUCSS
command.
|
FTP the new firmware image file
The following steps are generic to most FTP programs. Use your laptop/PC/UNIX to complete this procedure.
- Ensure that the new firmware image file is in the same directory where you will launch the FTP session.
- Enter
ping
source_ip_address to verify a communication link to the source circuit pack.
- Type
ftp
<source_ip_address> and press
Enter.
- Log into the source circuit pack with the same
ftplogin and
ftppassword that you used in the Set up file system section.
-
ftplogin is any temporary login for this FTP session, for example,
denver.
-
ftppassword is any temporary login for this FTP session, for example,
broncos.
- Type
bin and press
Enter.
This transfers files in binary format.
- If you are downloading to the TN2501AP (VAL) circuit pack only, type
cd / and press
Enter.
This command moves you from the announcement directory (default for FTP sessions) to the root directory (/) where firmware and other files are located.
- Type
put
filename.ext and press
Enter.
This command copies the new firmware image file to the destination directory.
- Type
dir and press
Enter.
Verify that the new firmware image file is on the circuit pack.
- Type
quit and press
Enter.
This ends the FTP session.
Verify files
From the SAT verify that the new firmware image file is on the circuit pack.
- Type
list directory board
<UUCSS> and press
Enter.
The List Directory screen displays.

List Directory screen
- Verify that the new firmware image file is listed in the
File/Directory Name field.
Schedule download
- Type
change firmware download and press
Enter.
The Firmware Download screen displays.
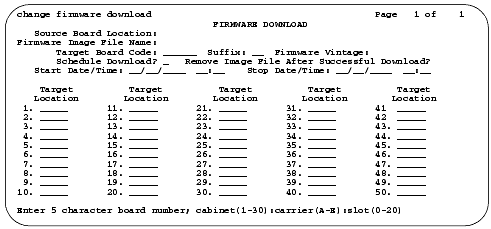
Firmware Download screen
- Fill in the fields listed in the table below:
| Firmware Download fields and descriptions
|
| Field |
Description |
Notes |
|
Source Board Location |
Type the UCCSS address of the source circuit pack. |
|
|
Firmware Image File Name |
Type the complete filename (including file extension) of the new firmware image file. |
See
Screen
in the section
Verify files
. |
|
Target Board Code |
Type the circuit pack ID, for example "TN2501."
| Note: |
Do not type the "AP" suffix.
|
|
Self-download:
This must be the same circuit pack type as the source circuit pack. You cannot mix circuit-pack types. Remote-download:
This must be the same circuit pack as the target circuit pack. |
|
Suffix |
Examples:
- For VAL (TN2501AP) type
AP.
- For C-LAN (TN799DP), type
DP.
- For DS1 (TN464GP), type
GP.
|
|
|
Firmware Vintage |
This is a display-only field for TN799DP (C-LAN) and TN2501AP (VAL). |
|
|
Schedule Download |
Type
y to schedule the firmware download for another time. Type
n to start the firmware download immediately after completing the form. |
Once the firmware download begins, you cannot make any changes to this form. If you answer
n(o), then the
Start Date/Time and
Stop Date/Time fields do not appear. The download begins as soon as you press
Enter. |
|
Remove Image File After Successful Download |
Type
y if you want the procedure to automatically remove the new firmware image file [default].
Type
n if you do not want the new firmware image file removed. |
At the completion of a successful download, the procedure automatically removes the new firmware image file from the source filesystem, freeing up the memory on the source circuit pack. We recommend using the default setting. If you set this field to
n, you must manually remove the new firmware image file from the source filesystem after the download has completed. See Disable filesystem. |
|
Start Date/Time |
Type the date and time that you want the firmware download to begin. |
See the Check specified resources section to ensure that the necessary resources are available. |
|
Stop Date/Time |
Type the date and time that you want the firmware download to end. |
If the scheduled stop time is reached before the new firmware image file has been downloaded to all circuit packs, the system finishes downloading to the circuit pack in progress before aborting the remainder of the download schedule. |
|
Target Location |
Type the UUCSS address of the circuit pack that you are updating. |
The circuit pack at this address must be the same type as the source circuit board. Y
ou can only put one entry in this
field. |
|

- Submit the schedule.
If you set the
Schedule Download field to
n, the download starts as soon as you submit the schedule.
| Note: |
If you receive a SAT error message asking you to use the
test firmware download command, this means that there was a problem with a previous firmware download. Run the test before proceeding.
|
| Caution! |
Unless the
Remove
Image
File
After
Successful
Download
field is set to
y
, the ftplogin and ftppassword remain on the TN799DP (C-LAN) and TN2501AP (VAL) circuit packs either until they are reset or until you issue the
disable filesystem board UUCSS
command.
|
- If you are self-downloading to a TN2501AP (VAL) circuit pack, reseat the pack:
| Danger! |
|
To prevent electrostatic discharge (ESD), be sure to wear a grounding strap while handling the circuit pack.
|
| Caution! |
Ensure that both the top green and top amber LEDs are out.
|
- Release the latch handle to free the circuit pack from the carrier.
- Pull the circuit pack out approximately 1-2 inches (2.54 to 5.08 cm.).
- Re-insert the circuit pack into the carrier.
- Close the latch securely.
Check specified resources
This procedure checks the header on the new firmware image file to ensure that the firmware download will run as you intend.
- Type
test firmware download and press
Enter.
The Test Results screen appears.

Test Results screen
- Look in the
Result field for
FAIL conditions.
- If the test does not pass, refer to the
Maintenance for Avaya MultiVantage DEFINITY Server.
- Re-run the test (
test firmware download).
When the test passes, every specified resource is available for the scheduled download.
Monitor download progress
- Type
status firmware download and press
Enter.
The Status Firmware Download screen displays.
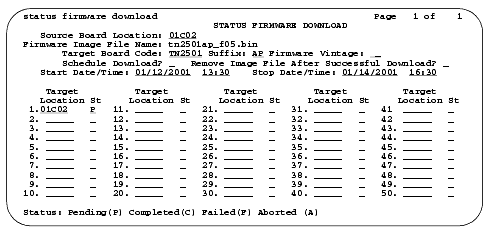
Status Firmware Download screen
- If this form is blank after issuing the command, go to Step 4.
- Check the
St (status) field immediately to the right of the
Target Location field's address of the circuit pack to view the progress of the firmware update:
-
(P)ending
-
(C)ompleted
-
(F)ailed
-
(A)borted
- Type
status firmware download
last and press
Enter.
This allows you to view the progress of the last completed firmware update or the entire schedule if it is completed.
| Caution! |
Unless the
Remove
Image
File
After
Successful
Download
field is set to
y
, the ftplogin and ftppassword remain on the TN799DP (C-LAN) and TN2501AP (VAL) circuit packs either until they are reset or until you issue the
disable filesystem board UUCSS
command.
|
- If you are self-downloading to a TN2501AP (VAL) circuit pack, reseat the pack:
| Danger! |
|
To prevent electrostatic discharge (ESD), be sure to wear a grounding strap while handling the circuit pack.
|
| Caution! |
Ensure that both the top green and top amber LEDs are out.
|
- Release the latch handle to free the circuit pack from the carrier.
- Pull the circuit pack out approximately 1-2 inches (2.54 to 5.08 cm.).
- Re-insert the circuit pack into the carrier.
- Close the latch securely.
Aborting a firmware download
If you need to abort a scheduled (pending) firmware download:
- Type
disable firmware download and press
Enter.
This command
- Continues to download the firmware image file to circuit pack in progress.
- Aborts the remainder of the download schedule.
- Clears the contents of the Firmware Download screen.
Remote download
This procedure allows you to update up to 50 target circuit packs of the same type using a new firmware image file distributed from a source TN799C/DP C-LAN circuit pack. This procedure can update these target circuit packs:
- 2-Wire Digital Line (TN2214CP or TN2224CP)
- IP Media Processor (TN2302AP)
- Maintenance/Test (TN771DP)
- UDS1 (TN464GP, TN2464BP, and TN2313AP)
Preparation
- Repeat the steps that are detailed in the Preparing to update firmware section.
Set up file system on circuit pack
Before you can load files onto the source circuit pack, you must first set up a file system on the circuit pack to accept the files.
- Log onto the switch using superuser or services login and password.
- Type
enable filesystem board
<UUCSS>
login
<ftplogin> <ftppassword> [size actual_size], where
-
ftplogin is any temporary login for this FTP session, for example,
denver.
-
ftppassword is any temporary login for this FTP session, for example,
broncos.
and press
Enter.
Later, you will use this same
ftplogin and
ftppassword in the FTP the new firmware image file section.
| Note: |
The optional
size
actual_size qualifier only works with TN799C (C-LAN). It allows you to specify a
smaller file-system size than the default 1-MB block (maximum) allocated.
If the source circuit pack does not have enough available memory, delete old files (
remove file
board
UUCSS filename), or wait until there is less traffic on the circuit pack.
|
| Caution! |
I
Unless the
Remove
Image
File
After
Successful
Download
field is set to
y
, the ftplogin and ftppassword remain on the TN799DP (C-LAN) and TN2501AP (VAL) circuit packs either until they are reset or until you issue the
disable filesystem board UUCSS
command.
|
FTP the new firmware image file
The following steps are generic to most FTP programs. Use your laptop/PC/UNIX to complete this procedure.
- Ensure that the new firmware image file is in the same directory where you will launch the FTP session.
- Type
ping
<source_ip_address> and press
Enter to verify a communication link to the source board.
- Type
ftp
<source_ip_address> and press
Enter.
- Log in to the source circuit pack with the same
ftplogin and
ftppassword that you used in the Set up file system section.
-
ftplogin is any temporary login for this FTP session, for example,
denver.
-
ftppassword is any temporary login for this FTP session, for example,
broncos.
- Type
bin and press
Enter.
This transfers files in binary format.
- Type
put
<filename.ext> and press
Enter.
This command copies the new firmware image file to the destination directory.
- Type
dir and press
Enter.
Verify that the new firmware image file is on the circuit pack.
- Type
quit and press
Enter.
This ends the FTP session.
Verify files
From the SAT verify that the new firmware image file is on the circuit pack.
- Type
list directory board
<UUCSS> and press
Enter.
The List Directory screen displays.
- Verify that the new firmware image file is listed in the
File/Directory Name field.

List Directory screen
Schedule download
- Fill in all of the fields in the Firmware Download fields and descriptions section except the
Target Location field.
| Note: |
If you are scheduling firmware downloads for a circuit pack that is designated as primary/secondary sync (timing) source (for example, TN464GP), this procedure automatically redesignates a local timing source during the download. After the download is complete and the circuit pack is returned to service, the procedure designates the original circuit packs as the timing source.
|
| Note: |
The target circuit packs are automatically busied out before the firmware is downloaded to them and automatically returned to service after the download is completed. While a DS1 circuit pack is busied out, any active calls through that circuit pack are dropped.
|
- In the
Target Location field, type the UUCSS address of each similar-type, programmable circuit pack (up to 50).
| Note: |
You can only download one image file to a similar type circuit pack at a given time (for example, to every TN464GP circuit pack). The download process
does not support broadcasting more than one image file to different-type circuit packs (for example, from TN464GP to TN2313BP).
|
If you do not know the target board locations:
- Type
list configuration all and press
Enter.
The System Configuration screen appears.
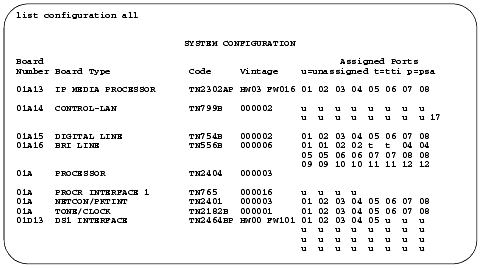
System Configuration screen
- Look for the "P" suffix in the
Code column and note the circuit pack's UUCSS address in the
Board Number field.
- Type the UUCSS address of all similar type circuit packs in the
Target Location field.
- Submit the schedule.
If you set the
Schedule Download field to
n, the download starts as soon as you submit the schedule.
| Note: |
If you receive a SAT error message asking you to use the
test firmware download command, this means that there was a problem with a previous firmware download. Run the test before proceeding.
|
Check specified resources
This procedure checks the header on the new firmware image file to ensure that the firmware download runs as you intend.
- Type
test firmware download and press
Enter.
The Test Results screen appears.

Test Results screen
- Look in the
Result field for
FAIL conditions.
- If the test does not pass, refer to the
Maintenance for Avaya MultiVantage DEFINITY Server.
- Re-run the test (
test firmware download).
When the test passes, every specified resource is available for the scheduled download.
Monitor download progress
- Type
status firmware download and press
Enter.
The Status Firmware Download screen displays.
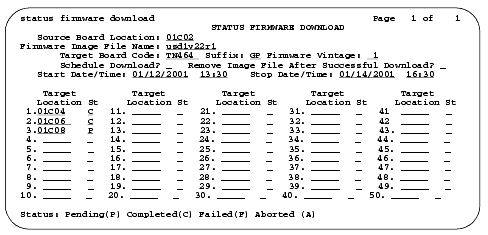
Status Firmware Download screen
Aborting a firmware download
If you need to abort a scheduled (pending) firmware download:
- Type
disable firmware download and press
Enter.
This command
- Continues to download the firmware image file to circuit pack in progress.
- Aborts the remainder of the download schedule.
- Clears the contents of the Status Firmware Download screen.
Disable filesystem
| Note: |
Performing the following steps on the TN799DP (C-LAN) or TN2501AP (VAL) circuit packs, removes only the
ftplogin
and the
ftppassword
. The allocated memory for the file system remains reserved for the session.
|
To free up resources on the source circuit pack, you must delete the new firmware image files and disable the filesystem.
- Type
remove file
board
<UUCSS> <filename> and press
Enter to remove image files from the source board.
- Type
list directory board
<UUCSS> and press
Enter.
The List Directory screen appears.
- Verify that the new firmware image file is
not listed in the
File/Directory Name field.
- Type
disable filesystem board
<UUCSS> and press
Enter to disable the filesystem on the source circuit pack.
| Note: |
This command is only successful if no files remain on the source circuit pack.
|
Troubleshooting firmware downloads
This section contains three troubleshooting sections:
Reset 1 or 2
If the system does a reset 1 or 2 and no alarms are present:
- At the SAT type
display initcauses and press
return.
- Clear any errors.
Test firmware download
To test the firmware download process:
- At the SAT type
test firmware download and press
return.
The Test Results screen (Screen ) appears.

Test Results screen
- The example shows PASS in the
Result field, indicating a successful test of the firmware download circuitry.
If the test does not pass, refer to the
Maintenance for Avaya MultiVantage DEFINITY Server.
Backing out of a firmware download
To revert back to the old firmware image file
on TN799DP (C-LAN) or TN2501AP (VAL) only:
- At the SAT type
get boot-image
<UUCSS> and press
return to check the status of the firmware images on the target circuit pack.
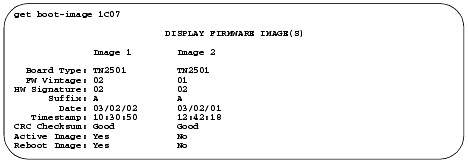
The Display Firmware Image(s) report appears.
Display Firmware Image(s) screen
- Check Image 1 and Image 2 to see where the active image resides.
- Check the date and time stamps to determine whether to revert back to
Image
1 or
Image
2.
In the following example, we are reverting back to Image 2, because it has the older date and time stamp.
- At the SAT type
set boot-image board
<UUCSS>
image
<1 | 2> and press
Enter.
Example:
set boot-image board
1C07
image
2
| Note: |
In most cases the image with the more recent date and time stamp is the new firmware image file.
|
The system responds with Command Successfully Completed.
- At the SAT type
get boot-image
<UUCSS> and press
return to check the status of the firmware images on the target circuit pack.
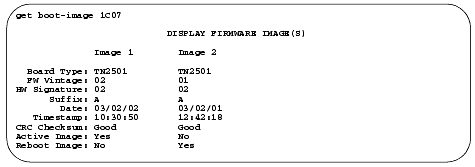
The Display Firmware Image(s) report appears.
Display Firmware Image(s) screen
Note that the values in both the
Active Image
and the
Reset Image
fields have changed.
- Reseat the circuit pack to activate the new firmware image:
| Caution! |
Electrostatic discharge can severely damage sensitive electronic circuits. Before handling any electronic hardware, be sure to wear a grounding wrist strap or other static-dissipating device.
|
|
| Caution! |
For TN2501AP (VAL) ensure that both the top green and top amber LEDs are out.
|
- Release the latch handle to free the circuit pack from the carrier.
- Pull the circuit pack out approximately 1-2 inches (2.54 to 5.08 cm.).
- Re-insert the circuit pack into the carrier.
- Close the latch securely.
- Wait until all 3 of the top LEDs (red, green, and amber) are out.
- At the SAT type
get boot-image
<UUCSS> and press
return to check the status of the firmware images on the target circuit pack.
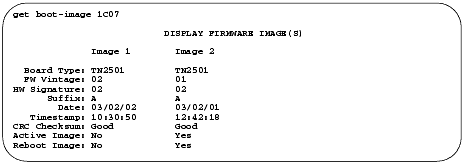
The Display Firmware Image(s) report appears.
Display Firmware Image(s) screen
- Ensure that both the
Active Image and the
Reset Image fields are as you expect.


