Install the Expanded Power Distribution Unit
Return to Task List
A second power distribution unit can be installed to provide power to additional devices.
The expanded power distribution unit kit contains:
- One 1146B Power Distribution Unit
- One "T" Cable
- Two #8-32 x 1/2-inch Shoulder Screws
- One #8-32 x 1 inch Screw
- One Spacer Bracket
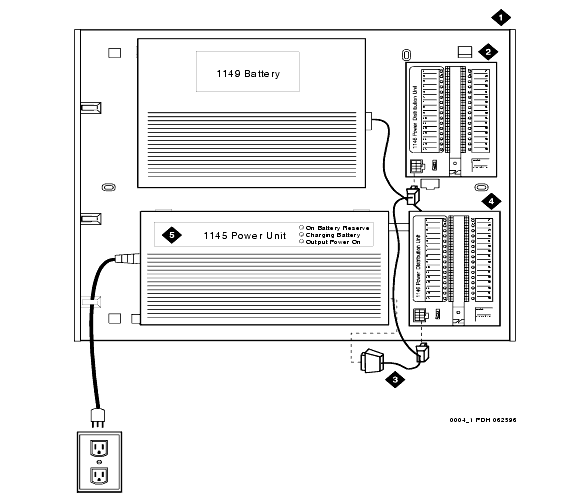
Refer to Expanded Power Distribution Unit while installing the power distribution unit.
- Set the spacer bracket onto the mounting plate and secure with the #8-32 x 1/2-inch shoulder screws. The spacer bracket is not shown in the figure but is installed behind the top power distribution unit.
- Slide the keyhole slots in the power distribution unit over the shoulder screws.
- Insert the #8-32 x 1 inch screw through the distribution unit, through the spacer bracket, and into the plate. The mounting hole is located just above the wire clip. Tighten the screw securely.
- Set the battery back-up switch to the 1-32 (down) position.
- Power-down the 1145B unit as described on the label on the side of the unit.
- Remove the output power cable between the 1145B and the 1146B units. The cable will not be reused.
- Connect the P1 connector end of the "T" cable to the bottom power distribution unit. Connect the P2 connector to the top distribution unit. Connect the P3 connector to the 1145B.
- Power-up the 1145B as described on the label on the side of the unit.
Expanded Power Distribution Unit

Figure Notes:
-
Wall-Mounting Plate
-
Second 1146B Power Distribution Unit
-
"T" Cable (H600-347-G7)
-
First 1146B Power Distribution Unit
- 1145B Power Unit
Return to Task List
