DEFINITY Made Easy Home Page Table of contents Previous page Next page Index Links Frequently asked questions
Go to Upgrades for si Go to Installation for MCC Go to Installation for SCC


Installing the 120A3A CSU

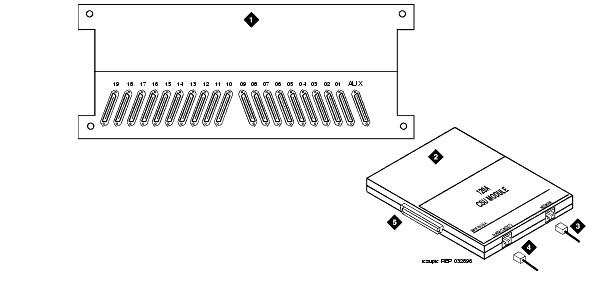
120A3A Channel Service Unit Module shows the connection points.


Note: Re-manufactured/repaired ICSU units and any manufactured after May 7, 2002 are marked as "120A3A."


Caution! Do not plug the 120A3A into any circuit packs other than a TN464F or TN767E (or later), or TN2464 or TN2313. Do not connect the 120A3A to any interface other than 700A DS1 loopback jack.

Be sure the DS1 circuit pack is set for 24-channel operation (1.544 Mbps). The 120A3A does not operate with the 32-channel interface. A switch on the circuit pack or administration sets this option.


Caution! Always wear an anti-static wrist strap when installing a 120A3A module. Do not touch the external alarm cable when it is connected to the 120A3A. Static discharge can damage connector terminals and relays.

  1. Unplug the DS1 circuit pack from its slot.

  2. Install a 4C retainer in the 50-pin plug associated with the DS1 circuit pack slot.

  3. Plug the 25-pair connector on the 120A3A directly into the plug associated with the DS1 circuit pack slot.

  4. Secure the 4C retainer around the 120A3A.

  5. Attach the supplied H700-383 cable to the 120A3A and to the 700A loopback jack.

  6. This cable is directional. To determine the end that connects to the 120A3A, perform a continuity test between pins 3 and 7. The end with this continuity is the 120A3A end. The shield is grounded only at the 120A3A end.

    Use the cable provided. If using cabling other than that provided with the 120A3A, see H700-383-Equivalent Cable Guidelines.

  7. If using external alarm equipment, attach the supplied DW8 cable to the 120A3A and the external equipment. The maximum length of this cable depends on the alarm equipment.

  8. If a TN464F is used, make sure the circuit pack is set for 24-channel operation. Set the switch on the circuit pack.

  9. From the DS1 circuit-pack form of the system administration console, set the line compensation field to 0-133 feet (40.6 m).

  10. Reset the 120A3A by reseating the DS1 circuit pack.

  11. When you reinsert the DS1 circuit pack after installing a 120A3A CSU the 120A3A resets. The DS1 circuit pack initializes and tests the 120A3A. When initialization and testing is complete, the green LED goes off. If the RED indicator is OFF after the test, the ICSU is working.

  12. If the circuits do not pass the self test, troubleshoot the 120A3A as instructed in Integrated CSU Module Installation and Operation.

H700-383 Cable Pin Assignments provides the H700-383 cable pinouts. H700-383 Cable Lengths by Group Number provides the cable lengths for each cable group number.

120A3A Channel Service Unit Module

Figure Notes:

H700-383 Cable Pin Assignments
Pin
Color
Channel Service Unit Designation
Network Designation
Function

1

BK

Line in 0

R1

RCV

2

Y

Line in 1

T1


3

Shield


4

R

Line out 0

R

XMT

5

G

Line out 1

T


7

Shield


7


Not assigned

8


Not assigned

H700-383 Cable Lengths by Group Number
Group
Length
Group
Length

1

25 feet (7.7 m)

5

125 feet (38.1 m)

2

50 feet (15.2 m)

7

200 feet (71 m)

3

75 feet (22.9 m)

7

400 feet (122 m)

4

100 feet (30.5 m)

8

750 feet (198.1 m)


DEFINITY Made Easy Home Page Table of contents Previous page Next page Index Links Frequently asked questions
Go to Upgrades for si Go to Installation for MCC Go to Installation for SCC
Copyright 2002 Avaya Inc.
Send comments to MadeEasy Development Team


Always check at the Made Easy Web site for the most current information.