Powering the 9600 Series IP Telephone
All 9600 Series IP Telephones can be locally powered with a Telephone Power Module (DC power jack), available separately. In addition, the telephones support IEEE 802.3af-standard LAN-based power. Before installing a 9600 Series IP Telephone, verify with the LAN administrator whether the LAN supports IEEE 802.3af, and if so, whether the telephone should be powered locally or by means of the LAN.
When you add devices like multiple button modules or a Bluetooth adapter to applicable 9600 Series IP Telephones, the power class may change. Table 1 shows the effect of such additions on the power class. For Power Class 2, set the switch labeled IEEE to L. For Power Class 3, set the switch labeled IEEE to H.
Table 1: Impact of Additional Devices on Telephone PoE* Power Class
|
Telephone Model
|
(A) Combinations Resulting in Power Class 2
|
(B) Combinations Requiring Auxiliary Power***
|
(C) Combinations Resulting in Power Class 3
|
| 9610 |
|
- |
- |
| 9620 |
- Telephone only
- Telephone + one SBM24
- Telephone + Bluetooth Adapter**
|
Telephone + GigE adapter + Bluetooth adapter + Bluetooth cradle +
3 SBM24 Button Modules |
Any combination of
telephone and attachments
not covered in columns
(A) or (B) |
| 9630 9640 9650 |
- Telephone only
- Telephone + one SBM24
- Telephone + Bluetooth Adapter**
|
Telephone + GigE adapter + Bluetooth adapter + Bluetooth cradle + 2 (or 3) SBM24 Button Modules |
Any combination of
telephone and attachments
not covered in columns
(A) or (B) |
| 9640G |
- Telephone only
- Telephone + one SBM24
- Telephone + Bluetooth Adapter**
|
- |
Any combination of
telephone and attachments
not covered in column (A) |
| 9630G |
- Telephone only
- Telephone + Bluetooth adapter**
|
- |
Any combination of telephone and attachments not covered in column (A) |
|
NOTE: *PoE - Power over Ethernet
**Assuming if a Bluetooth handset charging cradle is used, it is separately powered. If the charging cradle is not separately powered, Power Class 3 is required.
*** Use of the USB interface for additional features is planned for a future release. Until then, it is possible to use the USB interface as a power source for recharging certain devices. This use requires that auxiliary power is provided to the telephone.
Important: The last step in assembling the 9600 Series IP Telephone must be applying power. Apply power either by plugging the power cord into the power source (local powering) or plugging the modular line cord into the Ethernet wall jack (IEEE powering).
CAUTION: Failure to connect the proper cables with the proper jacks might result in an outage in part of your network.
Figures 1 through 4 provide illustrations to connect cords to jacks on 9600 IP Series Telephones. Use the illustrations and associated procedures as appropriate for telephone assembly.
| Telephone Model: |
See: |
| 9610 |
|
| 9620 |
|
| 9630, 9640, 9650 |
|
| 9630G, 9640G |
|
NOTE: Some 9600 Series IP Telephone models, for example the 9640, accommodate an external GigE (Gigabit Ethernet) adapter and/or a Bluetooth adapter. Installation options for those devices are not shown in the illustrations that follow, but are boxed with the device and are also available on the Avaya support Web site.
Figure 1: Connection Jacks on a 9610 IP Telephone
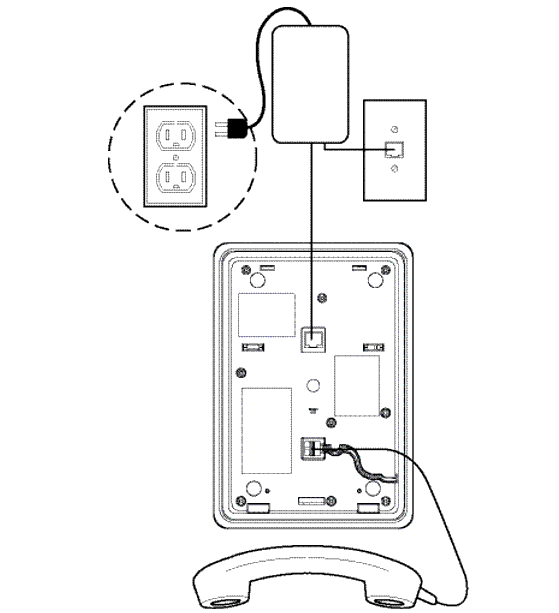
Figure 2: Connection Jacks on a 9620 IP Telephone

Figure 3: Connection Jacks on a 9630, 9640, or 9650 IP Telephone

Figure 4: Connection Jacks on a 9630G or 9640G IP Telephone
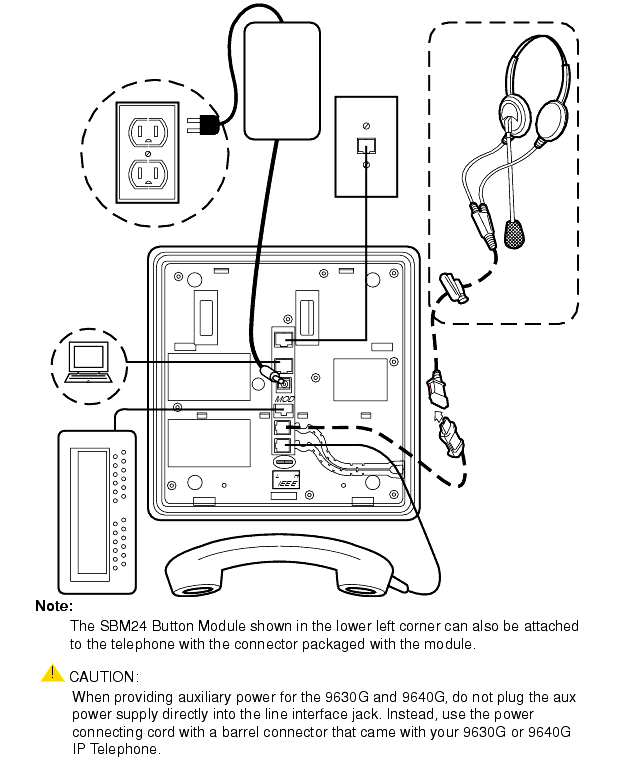
- Plug one end of the H4DU 4-conductor coiled handset cord into the telephone and the other end into the handset.
- Plug one end of the first Category 5 modular line cord into the Ethernet jack of the PC and the other end into the secondary Ethernet jack on the 9600 Series IP Telephone,
if appropriate.
- If the telephone is to be IEEE-powered, plug one end of the second Category 5 modular line cord into the Ethernet jack on the 9600 Series IP Telephone. Plug the other end of this cord into the Ethernet wall jack. You are now finished. Do not proceed to Steps 4 or 5.
- If the telephone is not a Gigabit Ethernet (GigE) telephone (for example, not a 9630G or 9640G) and is to be powered locally, connect one end of the second Category 5 modular line cord into the Ethernet jack on the 9600 Series IP Telephone. Plug the other end of this cord into the 1151 power brick jack labeled Phone. Plug another Category 5 cable into the 1151 power brick jack labeled Line. Plug the other end of this cable into the Ethernet wall jack. Finally, connect the 1151 to an AC power source. You are now finished. Do not proceed to Step 5.
- If the telephone is a GigE telephone (for example, a 9630G or a 9640G) and is to be powered locally, connect one end of the second Category 5 modular line cord into the Ethernet jack on the 9600 Series IP Telephone. Plug the other end of this cord into the Ethernet wall jack. Plug the DC power cord provided with the Gigabit Ethernet telephone into the 1151 power brick jack labeled Phone. Plug the other end of this cord into the barrel-shaped jack on the telephone. Finally, connect the 1151 to an AC power source. Note that with this powering arrangement, there is no connection to the 1151 power brick jack that is labeled Line.

|

|