Web Agent Procedure
To edit an AppleTalk interface using the Web Agent:
Note: You must enable AppleTalk globally and create an AppleTalk interface before you can edit an interface. See "Enabling AppleTalk Global Routing" and "Creating an AppleTalk Routing Interface" earlier in this chapter.
- In the navigation pane, expand the Routing > AppleTalk > Configuration folders, and then click Interfaces.
The AppleTalk Interfaces Web page is displayed in the content pane. See Figure�189.
- If there is no zone to select or if you want to edit the zones available, complete this step through step x. If not, skip to step x+1. Select Edit Zone to edit the AppleTalk zone for this interface.
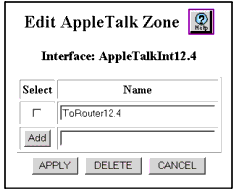
The Edit AppleTalk Zone Web page is displayed. See Figure�190.
Figure�190:�Edit AppleTalk Zone Web Page

- To add a new zone, enter the new AppleTalk zone name in the Add text field and click Add. Repeat this step as needed for each new zone on this interface.
- To change a zone name(s), place a check mark(s) in the Select column and make the change(s) to the zone name(s). Click Apply to save the new AppleTalk zone, or either Delete or Cancel to remove the new zone.
- In the navigation pane, expand the Routing > AppleTalk > Configuration folders, and then click Interfaces.
The AppleTalk Interfaces Web page is redisplayed in the content pane. See Figure�189.
- Select the new zone that you just created in the Default Zone field.
- Make sure there is a check mark next to the interface(s) you will modify.
- Select the VLAN to be associated with the interface in the VLAN field.
- Enter the new port metric to be associated with the interface in the Metric field.
- Select the new frame type to be associated with the interface in the Frame Type field.
- Enter the new network range start number in the Network Range Start field.
- Enter the new network range end number in the Network Range End field.
- Enter the new network number associated with the interface in the Network Number field.
- Enter the new node number to be associated with the interface in the Node field.
- Select Enable in the Admin. State field.
- Select the new default zone associated with the interface in the Default Zone field.
- Select the AppleTalk interface that you want to update in the Select column.
- Click APPLY to save your changes, or CANCEL to restore previous settings.
Note: You may select and change multiple interfaces simultaneously with one APPLY operation.
