|
|
|
To create a new IPX interface using the Web Agent:
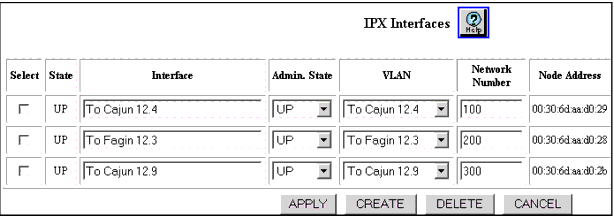
Figure 16-3. IPX Interfaces Dialog Box

NOTE: Only the create button is shown if no IPX Interfaces are configured.
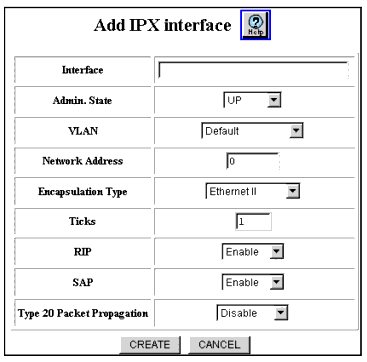
Figure 16-4. ADD IPX Interface Dialog Box

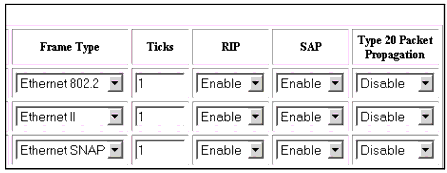
Figure 16-5. IPX Interfaces Dialog Box


NOTE: Due to its length, the IPX Interfaces dialog box is split into two views.
| Parameter |
Allows you to... |
|---|---|
| Select |
Select the Interface to be configured. This field id displayed in the IPX Interfaces Dialog box not in the Add Interfaces Dialog box. |
| Admin. State |
Select the administration state of the interface. Options include: Up Down |
| Interface |
Enter the name of the IPX interface.Up to 31 Alpha-numeric characters |
| VLAN |
Select the VLAN that corresponds to the IPX interface you selected. NOTE: Note: If you need to create a new VLAN, see “Creating and Implementing VLANs” in Chapter 6, “Using VLANs, Hunt Groups, and VTP Snooping.” |
| Network Number |
Enter the number of the IPX network you want to assign to the IPX interface. This number is a hexadecimal 32 bit (8 characters) number. |
| Node Address |
Displays the node address on which the IPX interface resides. A 48-bit (12 characters) number. This parameter is displayed in the IPX Interface dialog box, not in the Add IPX Interface dialog box. |
| Encapsulation Frame Type |
Select the format of the MAC header on the IPX packets sent by the router on the interface. Formats include: Ethernet II (Maximum Transmission Unit (MTU) = 1500) Ethernet 802.2 (MTU = 1497) Ethernet SNAP (MTU = 1492) Ethernet 802.3 (MTU = 1500) The default is Ethernet II |
| Ticks |
Specify the amount of time (in ticks) that the packet takes to reach the network number you specified. A tick is approximately 1/18th of a second. The default value is 1 |
| RIP |
Select Disable to prevent IPX RIP from routing globally. This affects all IPX interfaces set up to use the IPX RIP routing protocol. The default value is Enable. |
| SAP |
Select Disable to prevent IPX SAP from routing globally. This affects all IPX interfaces set up to use the IPX SAP routing protocol. The default value is Enable. |
| Type 20 Packet Propagation |
Specify whether or not Type 20 packets can be sent, received, disabled, or sent and received on a given interface. Options include: Disable - Type 20 packets are neither sent nor received. Inbound - Type 20 packets are received. Outbound - Type 20 packets are sent. Both - Type 20 packets are sent and received. The default value is Disable |
| |
|
|
|
|