Web Agent Procedure
To create IPX static routes using the Web Agent:
- Select Static Routes from Routing > IPX > Configuration group on the Web Agent window. The IPX Static Routes dialog box opens (see Figure 16-6).
Figure 16-6. IPX Static Routes Dialog Box

- To create a new IPX Static Route Click on CREATE
NOTE: Only the create button is shown if no IPX Static Routes are configured.
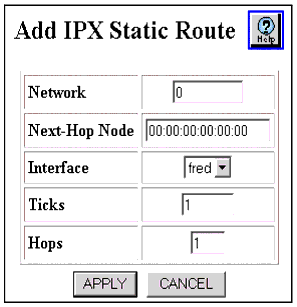
- The Add IPX Static Route dialog box opens (see Figure 16-7).
Figure 16-7. Add IPX Static Route Dialog Box

- See Table 16-4 to configure the IPX Static Route parameters.
Table 16-4. IPX Static Route Parameters
| Parameter |
Allows you to... |
| Network |
Enter the IPX network number that you want to assign to the IPX static route. |
| Next-Hop Node |
Enter the MAC address for the next destination to which the packet is routed. Format of the value to enter is aa:bb:cc:dd:ee:ff. |
| Interface |
View the IPX Interface associated with the next hop. |
| Ticks |
Enter the amount of time (in ticks) that the packet takes to reach the network number you specified. A tick is approximately 1/18th of a second. |
| Hops |
Enter the number of routers (hops) that the packet must pass through before reaching the network number associated with the IPX network. |
| |
- Click APPLY to save your changes, or CANCEL to restore previous settings.
- To view or modify IPX Static Routes, select Static Routes from Routing > IPX > Configuration group on the Web Agent window. The IPX Static Routes dialog box opens (Figure 16-8)
NOTE: It is also possible to create a static route by, making a RIP source route from the IPX Static Route Table.
Figure 16-8. IPX Static Routes Dialog Box


