Web Agent Procedure
To create and modify IPX RIP filters using the Web Agent:
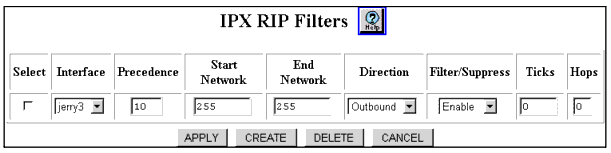
- Select Filters from the Routing > IPX > RIP group on the Web Agent window. The IPX RIP Filters dialog box opens (Figure 17-2). Only the CREATE button is displayed when no filters are configured.
Figure 17-2. IPX RIP Filters Dialog Box
- Select CREATE to create a new filter. The Add IPX RIP Filter dialog box opens (Figure 17-3).
Figure 17-3. Add IPX RIP Filter Dialog Box
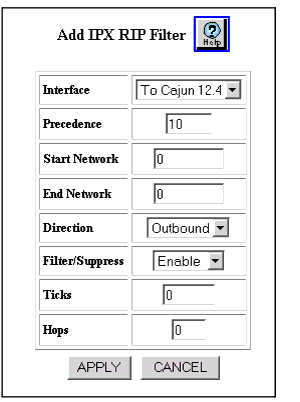
- See Table 17-2 to modify the Add IPX RIP Filter dialog box parameters.:
Table 17-2. Add IPX RIP Filters Dialog Box Parameters
| Parameter |
Allows you to... |
| Select |
The Select chechbox selects the IPX Interface. This box only appears with the IPX RIP Filters Dialog Box. |
| Interface |
Select the interface to which this filter will be applied to RIP packets sent and/or received on the interface. |
| Precedence |
Specify the filter precedence (in order of importance) with 0 equal to most important.
NOTE: Note: All filters on the same interface, must be assigned a unique filter precedence.
|
| Start Network |
Specify the first IPX network number in the range.The default is 0 |
| End Network |
Specify the last IPX network number in the range.The default is 0 |
| Direction |
Select the direction of the filter from a pull-down menu. The pull-down filter menu options are:
- Inbound - Apply the filter only to RIP packets received on the interface.
- Outbound - Apply the filter only to RIP packets sent on the interface.
- Both - Apply the filter to RIP packets both sent and received on the interface.
- The default is Outbound
|
| Filter/Suppress |
Disable the IPX networks (within the specified range in the filter) to be filtered (inbound) or suppressed (outbound).
- Filtered - Apply the filter only to RIP packets received (inbound direction) on the interface.
- Suppressed - Apply the filter only to RIP packets sent (outbound direction) on the interface.
Enable allows you to filter and suppress traffic and is the default. Select Disable to disable the filtering and suppression of traffic.The default is Enable |
| Ticks |
Specify the time (in ticks) that the packet takes to reach the network number you specified. A tick is approximately 1/18th of a second. This entry is used to override the value in the RIP packet. If you enter 0, there will be no override in the transmission of data on the network.The default is o |
| Hops |
Specify the number of routers (hops) that the packet must pass through before reaching the network number associated with the IPX interface. This entry is used to override the value in the RIP packet. If you enter 0, there will be no override in the transmission of data on the network. The default is 0 |
|
|
- Click APPLY to save your changes, or CANCEL to restore previous settings.
Example #1: Configuring your switch to suppress advertising of network 10
To configure your switch to suppress the advertising of network 10 on the IPX interface named Backbone, complete the following steps:
- Select Filters from the Routing > IPX > RIP group in the Web Agent window. The IPX RIP Filters dialog box opens (Figure 17-2).
- Select CREATE to create a new filter. The Add IPX RIP Filter dialog box opens (Figure 17-3).Configure the following parameters on the Add IPX RIP Filter dialog box:
- Select Backbone from the Interface pull-down menu.
- Enter 0 in the Precedence field.
- Enter 10 in the Start Network field.
- Enter 10 in the End Network field.
- Open the Direction pull-down menu and select Outbound.
- Open the Filter/Suppress pull-down menu and select Enable.
- Enter 0 in the Ticks and Hops fields.
- Click Apply to save your changes, or CANCEL to restore previous settings.
The filter created in this example ensures that all advertising of network 10 from the interface labeled Backbone is suppressed.
Example #2: Suppress Advertising of all Networks Except 10
To configure your switch to suppress the advertising of all networks except network 10 on the IPX interface named Backbone, you must first create two filters.
To create filter 1 from the Web Agent:
- Select Filters in the Routing > IPX > RIP group on the Web Agent window. The IPX RIP Filter dialog box opens (see Figure 17-2).
- Select Create to create a new filter. The Add IPX RIP Filter dialog box opens.
- Configure the following parameters:
- Select Backbone from the Interface pull-down menu.
- Enter 0 in the Precedence field.
- Enter 10 in the Start Network field.
- Enter 10 in the End Network field.
- Select Outbound from the Direction pull-down menu.
- Select Disable from the Filter/Suppress pull-down menu.
- Enter 0 in the Ticks and Hops fields.
Filter 1 ensures that the advertising of network 10 on the interface Backbone will not be suppressed. To suppress all other networks, proceed with the creation of Filter 2.
To create Filter 2 from the Web Agent:
- Repeat steps 1- 2 in the creating Filter #1 procedure.
- Configure the following parameters:
- Select Backbone from the Interface pull-down menu.
- Enter 1 in the Precedence field.
- Enter 0 in the Start Network field.
- Enter ffffffff in the End Network field.
- Select Outbound from the Direction pull-down menu.
- Select Enable from the Filter/Suppress pull-down menu.
- Enter 0 in the Ticks and Hops fields.
- Click APPLY to save your changes, or CANCEL to restore previous settings.
Filter 2 ensures that the advertising of all networks on the interface Backbone will be suppressed.
Together, Filter 1 and Filter 2 will act to suppress all network advertising with the exception of network 10. It is important to note that Filter 2 had the Precedence field set to 1 and Filter 1 had the Precedence field set to 0. Any filter with a Precedence of 0 will always override a filter with a precedence of 1 or higher.