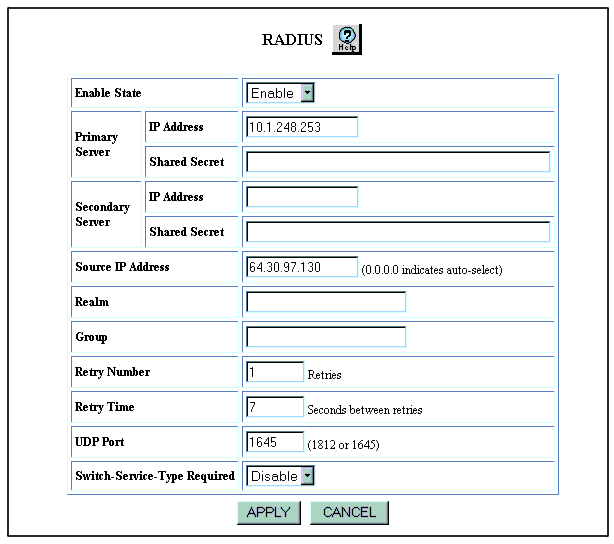
Table 4-3. RADIUS Web Page Configuration Parameters
| Parameter |
Definition |
| Enable State |
Enable or disable RADIUS on the switch. |
| Primary Server |
- IP Address - Enter the IP address for the Primary RADIUS server.
- Shared Secret - Enter the Shared Secret the switch will use for encrypting/decrypting passwords. Make sure the Primary server is configured with the exact same characters (case sensitive). This value is itself encrypted and will not be displayed anywhere (Web Agent or CLI) once set. It can be changed by simply entering in a new shared secret.
|
| Secondary Server |
- IP Address - Enter IP address for the Secondary RADIUS server.
- Shared Secret - Enter the Shared Secret the switch will use for encrypting/decrypting passwords. Make sure the Secondary server is configured with the exact same characters (case sensitive). This value is itself encrypted and will not be displayed anywhere (Web Agent or CLI) once set. It can be changed by simply entering in a new shared secret.
|
| Source IP Address |
Enter an IP interface address the switch will use as the source IP address in the Access Request messages. This value must be an IP interface address on the switch. If set, and the IP interface becomes disabled, RADIUS will not function because the switch will not be able to send or receive RADIUS messages. If left 0.0.0.0 (the default), the switch will automatically select (auto-select) a source IP address from one of its active interfaces. This implies you will have to add each of the switch’s IP addresses to the Client file on the RADIUS server since you won’t be guarantying the source IP address. |
| Realm |
Only set this parameter if Realms are used on the RADIUS server for organizing user accounts. If so, enter the ASCII text Realm name for the user accounts authorized to log into the Avaya switch. This implies that any user account authorized to log into this switch must reside in the same Realm. |
| Group |
Enter the ASCII Group name.The Group name will be included in the Access Request message sent to the RADIUS server. This implies that user accounts are configured with a Group name on the RADIUS server and that the Vendor Specific Attributes are set for the user accounts. |
| Retry Number |
Enter the number of times to re-send the Access Request message if there is no response. |
| Retry Time |
Enter the time (in seconds) to wait before re-sending an Access Request message. |
| UDP Port |
Enter the UDP port number. The default value is 1812. Valid options are 1812 or 1645 only. |
| Switch-Service-Type Required |
If enabled, the switch will only honor Access Accept messages that have the correct Group name included. This setting prevents the switch from incorrectly allowing access to users that may have a user account on the RADIUS server but should not be allowed access to the switch. This could occur if user “Bob” has a Standard RADIUS user account with Administrator (or Read-Only) privileges. When Bob logs in, the RADIUS server will authenticate him and respond with an Access Accept message of Administrator but will not include the VSAs and Group name associated with the Avaya switch. This implies anyone who has a Standard Account will be able to log into the Avaya switch. By enabling this setting and explicitly configuring user accounts with the switch-specific attributes and Group name, you will have tighter control over the security of the Avaya switch. |
|
|