Avaya Communicator for Windows: certificate error when registering SIP client using TLS transport


Doc ID    SOLN255437
Version:    15.0
Status:    Published
Published date:    27 Dec 2020
Created Date:    26 Aug 2014
Author:   
Luca Bonaita
 

Details

SMGR 6.3, SM 6.3, SM7.x
Avaya Communicator for Windows 2.1 (ACW)

Problem Clarification

After ACW2 has been installed and configured, when customer tries to log with Avaya Communicator, an error is displayed

"The security certificate required for connection is not installed. Please Contact your support."


Cause

Avaya Communicator validates the server identity certificate during the TLS connection establishment process. If the application cannot establish a TLS connection because of an inability of the device to validate the certificate, the application displays an error message.
The new generation of Avaya Communicator clients will require servers to have certificates issued by a trusted certificate authority in order for the client to establish a secure connection.
These clients will no longer trust demonstration certificates issued by the Avaya SIP Product Certificate Authority by default.
If your network is using certificates issued by the Avaya SIP Product certificate authority, Avaya Aura System Manager, an enterprise certificate authority, or a third-party certificate authority that is not well-known, you will need to ensure that the certificate authority (or authorities) that issued your server certificates is trusted by the client devices. To do that, you will need to distribute the CA certificates to the client devices and ensure that they are installed.
See pag.9 of the attached “Updatingserver<..>.pdf” document.

"The security certificate required for <...> is not installed"
If the user reports this message, it means that the server certificate is not trusted by their client device. To resolve this issue, ensure that the issuing CA certificate is installed on their device and that all certificates in the trust chain are valid.

Solution

Obtaining the Avaya SIP Product CA certificate
1. On System Manager Web Console, click Elements > Inventory > Manage Elements.
The system displays the Manage Elements screen.
2. Select the Session Manager instance from the list.
3. In the More Actions field, select Configure Trusted Certificates.
The system displays the Trusted Certificates screen.
4. Select an Avaya SIP Product CA certificate from the list --> select the one with the description:
SECURITY_MODULE_HTTP CN=SIP Product Certificate Authority, OU=SIP Product Certificate Authority, O=Avaya Inc., C=US
5. Click Export. -->  you will get a file called trust-cert.pem
6. Save the file to a location on your system.
7. change the certificate extension from trust-cert.pem to trust-cert.crt
8. Install the certificate

Obtaining the Avaya Aura® System Manager CA certificate
1. On the home page of System Manager Web Console, under Services, click Security > Certificates > Authority.
2. On the main page, click Download pem file.
3. Save the file to a location on your system.
4. change the certificate extension from PEM to CRT.
5. Install the certificate

Here is a brief guideline on how to install certificates on windows 7:
 
  1. Install the certificate.
    1. Double-click the default.cacert.cer certificate file icon on your desktop (or default save location) to install the certificate.
    2. When the Certificate window opens, click Install Certificate.
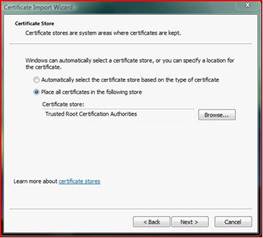
    3. Certificate Import Wizard will open. Click Next.
  2. Specify a location for the certificate.
    1. Select Place all certificates in the following store.
    2. Click Browse.
  3. Select the certificate store.

Select Trusted Root Certification Authorities.
 

  1.  Click OK.
  1. Place the certificate in the store.
    1. Click Next to continue.

  1. Complete installation.
    1. Click Finish
    2. You will get a Security Warning, click on Yes

Please read the below document on Updating server certificates to improve end-user security and client user
experience at:

downloads.avaya.com/css/P8/documents/100180626

Attachment File

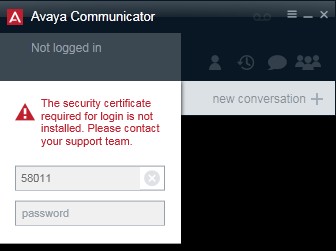
Updatingservercertificatestoimproveend-usersecurityandclientuserexperience.pdf
0Bytes • < 1 minute @ 56k, < 1 minute @ broadband


Attachment File

AdministeringAvayaCommunicator.pdf
0Bytes • < 1 minute @ 56k, < 1 minute @ broadband


Additional Relevant Phrases

One-x Communicator SIP trought Avaya Session Manager does not appear the functional keys.TLS registration experience issue with the CA 1xC domain name different from the client certificate SAN ACLync version 6.4.0.5.39 installed as an update from version 6.4.0.2 on the advice of backbone to resolve a video issue when using skype for business 2016, now getting a security certificate error message unable to login getting security certificate error getting certificate error on registering SIP SET TLSSRVRID ++++++++++++++++++++++++++++++++ Downloaded the root Certificate of CM and uploaded it to the session manager trusted store. Here is the CM directory location where you can download the CM root certificate with issuer of ““SIP Product Certificate Authority”” [root@CMserver]# pwd /etc/opt/ecs/certs/cm/CA [root@wp-cm-vm CA]# ls sip_product_root.crt sip_product_root.crt NOTE: The above step does not require 'root' access, standard 'dadmin' or Avaya's 'init' login can be used because the file has read access for all. I then uploaded this certificate in the SMGR web under Home / Services / Inventory / Manage Elements/ Select your ASM (check box) and from More Actions select Manage Trusted Certificates (for ASM 6.3 Configure Trusted Certificates)/ Add Trusted Certificate, Select Store Type to add trusted certificate “All”, Select Import from file, Browse to select the location of file, Retrieve Certificate and when Commit.

Avaya -- Proprietary. Use pursuant to the terms of your signed agreement or Avaya policy