 |
Modular Messaging Help
|
|

|
Example 4: Shared extension
|
It is possible for several subscribers share a single telephone extension, using a caller application to set it up. An extension set up this way might, for instance, allow a caller to speak with a particular individual subscriber or leave a message that is available to anyone on the shared extension.
The following example has been created to illustrate how to set up a shared extension using a caller application. In this example, four individuals work in the sales department of a company. When the caller reaches the system by dialing the shared extension number, the system offers a menu to speak with any of the individuals or to leave a message in the group voice mailbox.
This sample application also allows the caller to reach a receptionist who works for the entire sales department, and to hear the menu again.
Considerations
In this example, only the caller application ID number (4350) is administered as an extension at the switch. Nonresident subscriber extensions—that is, extensions that are not administered at the switch—are used for each of the sharing subscribers. The caller application can transfer callers directly to these extensions or to the group mailbox, which is accessible to each of the shared extension subscribers.
In this case, if the individual subscriber is not available to answer the call, the system automatically transfers the caller to the individual’s voice mailbox.
After creating and deploying this caller application, you must remember to create an association with an ID number of 4350 for this application. This caller application ID number then overrides the extension 4350 when the caller reaches the system (so that you could still use the extension number of 4350 for the group’s receptionist).
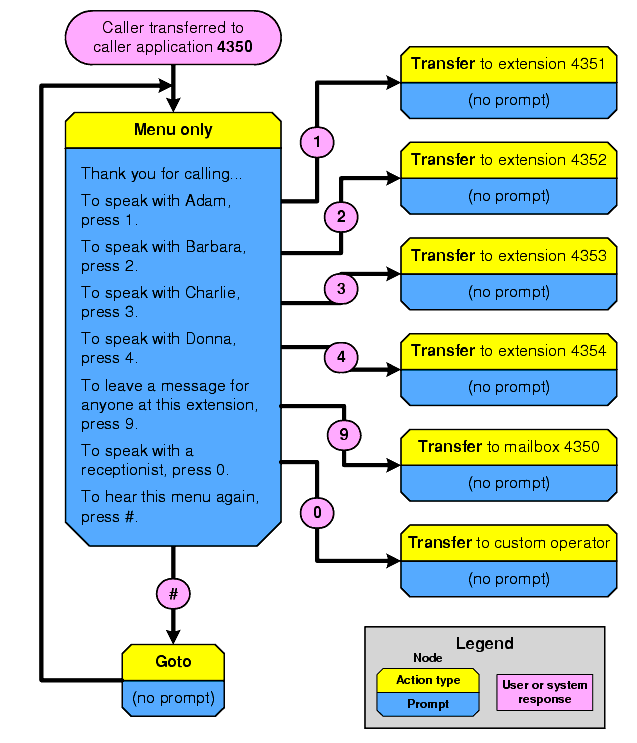
The caller application design
The following is a possible call flow for a shared extension.
Building the application
The following table presents a step-by-step method for building the caller application. It assumes that you have already started the Caller Applications Editor. The Action(s) column gives a description of the step in the process, and the Location of procedure(s) column provides a link to the detailed procedure in the documentation that tells how to perform the step.
|
Step
|
Action(s)
|
Location of procedure(s)
|
|
1
|
Create the caller application base node. Name it Shared extension. Provide a brief description and select the language.
|
|
|
2
|
Modify the caller application base node properties:
- Select Menu only as the action type.
- Select Play entry prompt and then select Application prompt.
- Add a prompt and enter “Shared extension menu” under Comments.
Note:
You will not actually record the prompt at this point, you are merely creating a placeholder for it.
- Set the application to use the Custom operator, 4350 as the Custom operator number, <Parent node> as the Default cancel setting, and the * key as the Default cancel key.
|
|
|
3
|
Add four application (action) nodes to the base node. These nodes will all be Transfer nodes used to transfer the caller to the desired sales person.
- Name the nodes Transfer to Adam, Transfer to Barbara, etc.
- Select Transfer as the action type.
- Select 1, 2, 3, and 4 for the Key presses.
- Provide brief descriptions.
|
|
|
4
|
Modify the application (action) nodes’ properties:
- On the General tab, verify that Extension is selected and set 4351, 4352, 4353, and 4354 as the extension numbers.
- You do not need a prompts for these nodes, so verify that the Play entry prompt check boxes are cleared (Prompt tab).
|
|
|
5
|
Add another application (action) node to the base node. This node will allow the caller to leave a message in the common (group) mailbox.
- Name the node Leave message.
- Select Transfer as the action type.
- On the General tab, verify that Mailbox is selected and set 4350 as the mailbox number.
- Select 9 for the Key press.
- Provide a brief description.
|
|
|
6
|
Modify the application (action) node properties:
- On the General tab, verify that Node is selected.
- From the drop-down box, select the caller application node for this caller application, Main Menu.
- You do not need a prompt for this node, so verify that the Play entry prompt check box is cleared (Prompt tab).
|
|
|
7
|
Add another application (action) node to the base node. This node will allow the caller to reach the sales department’s receptionist.
- Name the node Transfer to receptionist.
- Select Transfer as the action type.
- Select 0 for the Key press.
- Provide a brief description.
|
|
|
8
|
Modify the application (action) node properties:
- On the General tab, verify that Operator is selected.
- You do not need a prompt for this node, so verify that the Play entry prompt check box is cleared (Prompt tab).
|
|
|
9
|
Save the application, if you have not already done so.
|
|
Top of page