Downloading Firmware to Port Circuit Packs
The Firmware Download feature allows you to download new firmware to one or more circuit packs that have the "P" suffix within the same system. This feature eliminates having to physically remove the circuit pack and sending it to the factory for a firmware update.
The table below shows the high-level processes outlined in this document.

Downloadable Circuit Packs
These procedures apply to these circuit packs (and higher suffixes):
- UDS1 (TN464GP, TN2464BP, and TN2313AP)
- Maintenance/Test (TN771DP)
- Control LAN (C-LAN) (TN799DP)
- IP Media Processor (TN2302AP)
- Voice Announcements over LAN (VAL) (TN2501AP)
Before you start
Hardware/software requirements
The following items are needed to download firmware to the appropriate circuit packs:
DEFINITY ECS
- Use the DEFINITY ECS hardware with the system software releases:
- Web browser (Netscape 4.5 or Internet Explorer 5 or higher)
Download image from support Web site
For the download, you need a temporary staging area to keep the firmware images before uploading them to the source circuit pack. Although the download is normally done from a PC, you can also use other servers, such as UNIX.
- Go to the Avaya Customer Support Web site (
http://support.avaya.com).
- Select the
Online Services link near the top left of the page.
- Select
Software/Firmware Downloads.
A page with a large table appears.
- Find and click on the following table entry:
Grouping
Product Name
Document Title
Communication Definity Enterprise Definity Firmware
Systems Communication Server(G3x) Downloads
The main DEFINITY Firmware Download page appears.
- Select the circuit pack you want to upgrade, then the firmware images that you need (there may be more than one, depending on the circuit pack).
For example, the
tn2501ap_f05.bin filename is for the TN2501AP (VAL) circuit pack.
- Download the file to the directory from which you will launch the FTP application.
Pre-download checks
At the SAT:
- Type
change permissions
<login>
and press
Enter
.
Ensure that the
Administer Features
field is
y
on the Command Permissions Categories screen.
- Get the IP address for the source circuit pack either from the data systems administrator or by typing the following SAT commands:
- If you know the circuit pack address, type
list configuration board
<UUCSS> and press
Enter.
If you do not know the circuit pack address, type
list configuration all and press
Enter.
Check that these ports are enabled:
- Port 17 (C-LAN)
- Port 33 (VAL)
- Type
display port
<UUCSSpp> and press
Enter to obtain the data module ID, where
pp is the port number.
- Type
display data-module
<ID>
and press
Enter to obtain the link number.
- Type
status link
<link_number> and press
Enter to check the link status and obtain the source IP address.
Self-download
In this procedure you will use an FTP client to copy the new firmware image file to a circuit pack. Then you will copy the new image to the FLASH memory on the pack. This procedure updates
only a single circuit pack and applies to these circuit packs:
- Control LAN (C-LAN) (TN799DP)
- Voice Announcements over LAN (VAL) (TN2501AP)
Set up file system on circuit pack
Before you can load files onto the source circuit pack, you must first set up a file system on the circuit pack to accept the files.
- Log onto the switch using superuser or services login and password.
- Type
enable filesystem board
<UUCSS>
login
<ftplogin> <ftppassword> [size actual_size], where
-
ftplogin is any temporary login for this FTP session, for example,
denver.
-
ftppassword is any temporary login for this FTP session, for example,
broncos.
and press
Enter.
You will use this same
ftplogin and
ftppassword later in the FTP the new firmware image file section.
If the source circuit pack does not have enough available memory, delete old files (
remove file
board
<UUCSS> <filename>) or wait until there is less traffic on the board.
FTP the new firmware image file
The following steps are generic to most FTP programs. Use your laptop/PC/UNIX to complete this procedure.
- Ensure that the new firmware image file is in the same directory from which you will launch the FTP session.
- Type
ping
<source_ip_address> and press
Enter to verify a communication link to the source board.
- Type
ftp
<source_ip_address> and press
Enter.
- Log in to the source circuit pack with the same
ftplogin and
ftppassword that you used in the Set up file system on circuit pack section.
-
ftplogin is any temporary login for this FTP session, for example,
denver.
-
ftppassword is any temporary login for this FTP session, for example,
broncos.
- Type
bin and press
Enter.
This transfers files in binary format.
- If you are downloading to the TN2501AP (VAL) circuit pack only, type
cd / and press
Enter.
This command moves you from the announcement directory (default for FTP sessions) to the root directory (/) where firmware and other files are located.
- Type
put
<filename.ext> and press
Enter.
This command copies the new firmware image file to the destination directory.
- Type
dir and press
Enter.
Verify that the new firmware image file is on the circuit pack.
- Type
quit and press
Enter.
This ends the FTP session.
Verify files
From the SAT verify that the new firmware image file is on the circuit pack.
- Type
list directory board
<UUCSS> and press
Enter.
The List Directory screen displays.
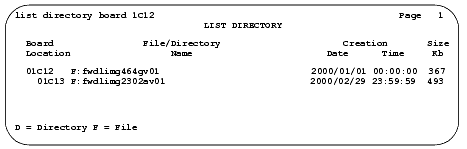
List Directory screen
- Verify that the new firmware image file is listed in the
File/Directory Name field.
Schedule download
- Type
change firmware download and press
Enter.
The Firmware Download screen displays.
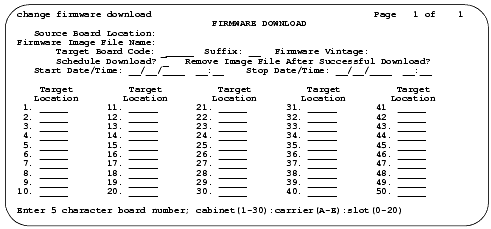
Firmware Download screen
- Fill in the fields listed in the table below:

- Submit the schedule.
If you set the
Schedule Download field to
n, the download starts as soon as you submit the schedule.
- Release the latch handle to free the circuit pack from the carrier.
- Pull the circuit pack out approximately 1-2 inches (2.54 to 5.08 cm.).
- Re-insert the circuit pack into the carrier.
- Close the latch securely.
Check specified resources
This procedure checks the header on the new firmware image file to ensure that the firmware download will run as you intend.
- Type
test firmware download and press
Enter.
The Test Results screen (Screen ) appears.
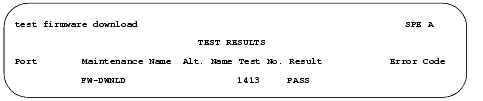
Test Results screen
- Look in the
Result field for
FAIL conditions.
- If the test does not pass, refer to the
Maintenance for Avaya MultiVantage DEFINITY Server.
- Re-run the test (
test firmware download).
When the test passes, all specified resources are available for the scheduled download.
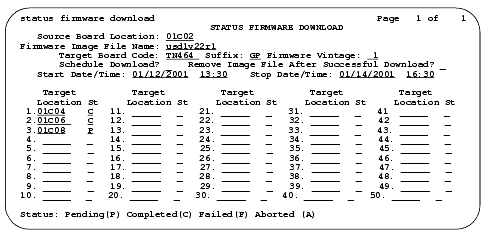
Monitor download progress
- Type
status firmware download and press
Enter.
The Status Firmware Download screen displays.
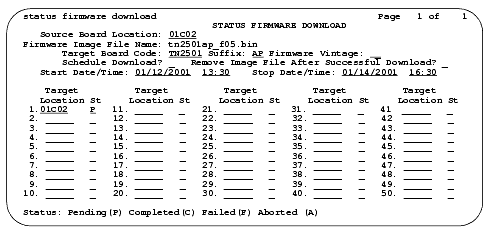
Status Firmware Download screen
- If this form is blank after issuing the command, go to Step 4.
- Check the
St (status) field immediately to the right of the
Target Location field's address of the circuit pack to view the progress of the firmware update:
-
(P)ending
-
(C)ompleted
-
(F)ailed
-
(A)borted
- Type
status firmware download
last and press
Enter.
This allows you to view the progress of the last completed firmware update or the entire schedule if it is completed.
- Release the latch handle to free the circuit pack from the carrier.
- Pull the circuit pack out approximately 1-2 inches (2.54 to 5.08 cm.).
- Re-insert the circuit pack into the carrier.
- Close the latch securely.
Aborting a firmware download
If you need to abort a scheduled (pending) firmware download:
- Type
disable firmware download and press
Enter.
This command
- Continues to download the firmware image file to circuit pack in progress.
- Aborts the remainder of the download schedule.
- Clears the contents of the Firmware Download screen.
Remote download
This procedure allows you to update up to 50 target circuit packs of the same type using a new firmware image file distributed from a TN799C/DP (C-LAN) source circuit pack. This procedure updates these target circuit packs:
- UDS1 (TN464GP, TN2464BP, and TN2313AP)
- Maintenance/Test (TN771DP)
- IP Media Processor (TN2302AP)
Preparation
- Repeat the steps that are detailed in the Before you start section.
Set up file system on circuit pack
Before you can load files onto the source circuit pack, you must first set up a file system on the circuit pack to accept the files.
- Log onto the switch using superuser or services login and password.
- Type
enable filesystem board
<UUCSS>
login
<ftplogin> <ftppassword> [size actual_size], where
-
ftplogin is any temporary login for this FTP session, for example,
denver.
-
ftppassword is any temporary login for this FTP session, for example,
broncos.
and press
Enter.
You will use this same
ftplogin and
ftppassword later in the FTP the new firmware image file section.
If the source circuit pack does not have enough available memory, delete old files (
remove file
board
<UUCSS> <filename>) or wait until there is less traffic on the board.
FTP the new firmware image file
The following steps are generic to most FTP programs. Use your laptop/PC/UNIX to complete this procedure.
- Ensure that the new firmware image file is in the same directory from which you will launch the FTP session.
- Type
ping
<source_ip_address> and press
Enter to verify a communication link to the source board.
- Type
ftp
<source_ip_address> and press
Enter.
- Log in to the source circuit pack with the same
ftplogin and
ftppassword that you used in the Set up file system on circuit pack section.
-
ftplogin is any temporary login for this FTP session, for example,
denver.
-
ftppassword is any temporary login for this FTP session, for example,
broncos.
- Type
bin and press
Enter.
This transfers files in binary format.
- Type
put
<filename.ext> and press
Enter.
This command copies the new firmware image file to the destination directory.
- Type
dir and press
Enter.
Verify that the new firmware image file is on the circuit pack.
- Type
quit and press
Enter.
This ends the FTP session.
Verify files
From the SAT verify that the new firmware image file is on the circuit pack.
- Type
list directory board
<UUCSS> and press
Enter.
The List Directory screen displays.
- Verify that the new firmware image file is listed in the
File/Directory Name field.

List Directory screen
Schedule download
- Fill in all of the fields in the Firmware Download fields and descriptions section except the
Target Location field.
If you do not know the target board locations:
- Type
list configuration all and press
Enter.
The System Configuration screen appears.
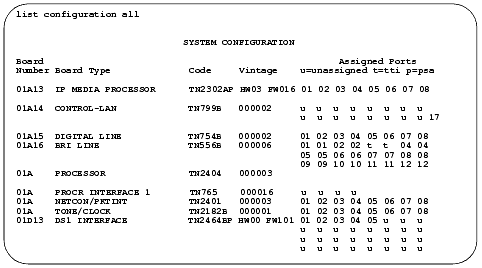
System Configuration screen
- Look for the "P" suffix in the
Code column and note the circuit pack's UUCSS address in the
Board Number field.
- Type the UUCSS address of all similar type circuit packs in the
Target Location field.
- Submit the schedule.
If you set the
Schedule Download field to
n, the download starts as soon as you submit the schedule.
Check specified resources
This procedure checks the header on the new firmware image file to ensure that the firmware download runs as you intend.
- Type
test firmware download and press
Enter.
The Test Results screen appears.
Test Results screen
- Look in the
Result field for
FAIL conditions.
- If the test does not pass, refer to the
Maintenance for Avaya MultiVantage DEFINITY Server.
- Re-run the test (
test firmware download).
When the test passes, all specified resources are available for the scheduled download.
Monitor download progress
- Type
status firmware download and press
Enter.
The Status Firmware Download screen displays.
Status Firmware Download screen
Aborting a firmware download
If you need to abort a scheduled (pending) firmware download:
- Type
disable firmware download and press
Enter.
This command
- Continues to download the firmware image file to circuit pack in progress.
- Aborts the remainder of the download schedule.
- Clears the contents of the Status Firmware Download screen.
Disable filesystem
To free up resources on the source circuit pack, you must delete the new firmware image files and disable the filesystem.
- Type
remove file
board
<UUCSS> <filename> and press
Enter to remove image files from the source board.
- Type
list directory board
<UUCSS> and press
Enter.
The List Directory screen appears.
- Verify that the new firmware image file is
not listed in the
File/Directory Name field.
- Type
disable filesystem board
<UUCSS> and press
Enter to disable the filesystem on the source circuit pack.