Made Easy Tool for DEFINITY Media Server Configurations
Issue 4, May 2002
Downloading Firmware to Port Circuit Packs
Troubleshooting firmware downloads
This section contains three troubleshooting sections:
Reset 1 or 2
If the system does a reset 1 or 2 and no alarms are present:
Test firmware download
To test the firmware download process:
- At the SAT type test firmware download and press return.
The Test Results screen (Screen ) appears.

Test Results screen
- The example shows PASS in the Result field, indicating a successful test of the firmware download circuitry.
If the test does not pass, refer to the Maintenance for Avaya MultiVantage DEFINITY Server.
Backing out of a firmware download
To revert back to the old firmware image file on TN799DP (C-LAN) or TN2501AP (VAL) only:
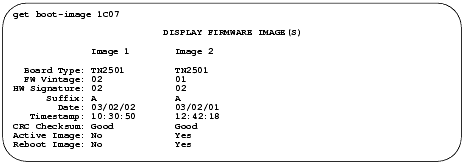
- At the SAT type get boot-image <UUCSS> and press return to check the status of the firmware images on the target circuit pack.
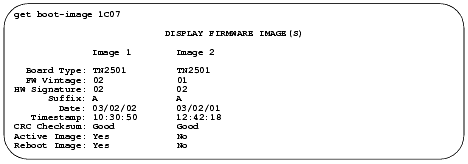
Display Firmware Image(s) screen
Check the date and time stamps to determine whether to revert back to Image 1 or Image 2. In the example that follows, we are reverting back to Image 2, because it has the older date and time stamp.