|
|
|
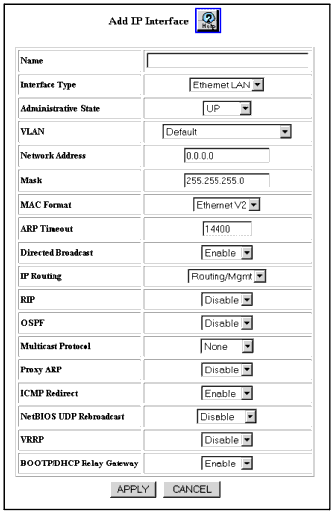
After you have set up a VLAN, you must create the IP interface that your VLAN and your subnet uses to communicate with each other. While creating the IP interface, you must assign it to the VLAN. The last step is to enable IP forwarding (Routing) global parameters.
To create a new IP interface and assign it to a VLAN:
Figure�94:�Add IP Interface Web page

| Parameter |
Description |
|---|---|
| Name |
Enter a unique, alphanumeric name for the interface (maximum 30 characters) |
| VLAN |
A pull down menu that associates a VLAN with this IP Interface. Note: The way that you configure a port(s) to a VLAN determines the IP Routing option that you select for the interface. Use the following options to configure the appropriate interface:
Note: The following two parameters, Ethernet-Console and Serial-Console are special IP interface settings, and are not part of the normal routed data path. Do not configure routing only or routing and management for the serial interface or the Ethernet Console, configure both for management only. |
| Interface Type |
Ethernet LAN or NBMA. Non-Broadcast Multi-Access (NBMA) IP Interfaces. Makes it possible for the switch to exchange routing information over nonbridged connections (routed virtual switch ports (VSPs)) NBMA functionality was added to RIP and OSPF routing protocols on the Avaya Multiservice switch software. |
| Administrative State |
Specify the administrative state of the interface. Options include:
|
| Network Address |
Enter the network IP address for the selected interface. |
| Mask |
Enter the subnet mask for the interface. |
| MAC Format |
Select the MAC address format for the interface. Options include:
|
| ARP Timeout |
Enter the timeout period for Address Resolution Protocol (ARP) in seconds.The ARP Timeout value is the period of time the switch will wait for data from a station, if no data is received, the station is deleted from the ARP Table. The default is 14,400 seconds (4 hours). |
| Directed Broadcast |
When the IP Directed Broadcast feature is Enabled, it allows a Network Directed Broadcast (unicast IP address with the Host ID set to all One's) to be forwarded by the router on the selected interface. The default is Enable. |
| IP Routing |
Select enable or disable IP routing on the interface. Options include:
Note: Do not enable routing protocols on an interface configured for Mgmt Only since the interface will act as an end point and will not pass traffic.
|
| RIP |
Enable or disable RIP. The default value is Disable. |
| OSPF |
Enable or disable OSPF. The default value is Disable. Note: To Enable OSPF, The Admin State of the IP interface must be set to down. Enable OSPF and then set the Admin State to up. |
| Multicast Protocol |
Specify the multicast protocol for the interface. Options include:
Note: By Default, multicast forwarding is disabled. To enable multicast forwarding go to the IP Global Configuration page. |
| Proxy ARP |
Enable or disable Proxy ARP. The default value is Disable. |
| ICMP Redirect |
Enable or disable ICMP Redirect (IDRP). The default value is Enable. |
| NetBIOS UDP Rebroadcast |
Enable or disable NetBIOS UDP Rebroadcasts. The default value is Disable. |
| VRRP |
Enable or disable Virtual Redundancy Router Protocol. The default value is Disable. |
| BOOTP/DHCP Relay Gateway |
Enable or disable the BOOTP/DHCP Relay Agent. The default value is Enable. |
|
|
|