Web Agent Procedure
To configure ports on a Fast Ethernet module using the Web Agent:
- In the navigation pane, expand the Modules & Ports folder, and then click Configuration. The Module Information Web page in the content pane. See Figure�66.
- Select the check box in the Slot column next to the Fast Ethernet module to change the Name field, if desired, change the module name then Click the APPLY button.
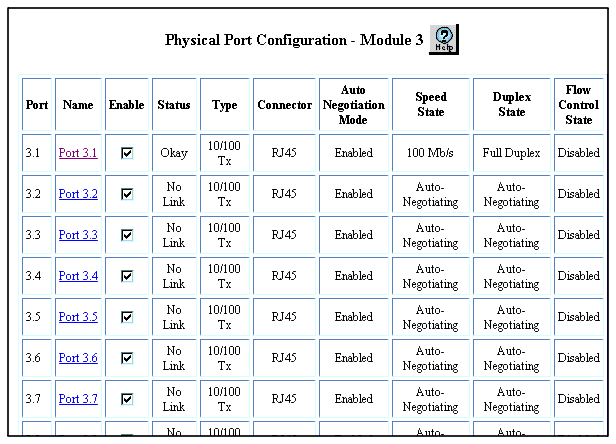
- Select the number in the Ports column for the Fast Ethernet module that you want to configure. The Physical Port Configuration Web page is displayed. See Figure�71.
Figure�71:�Physical Port Configuration Web Page for the Fast Ethernet Module

- By default the check box is selected in the Enable column. To change the enable clear the check in the check box.
- If you change the enable check box Click APPLY to save your settings, or CANCEL to restore previous settings.
- Select a port name from the Name field (for example, Port 6.1).
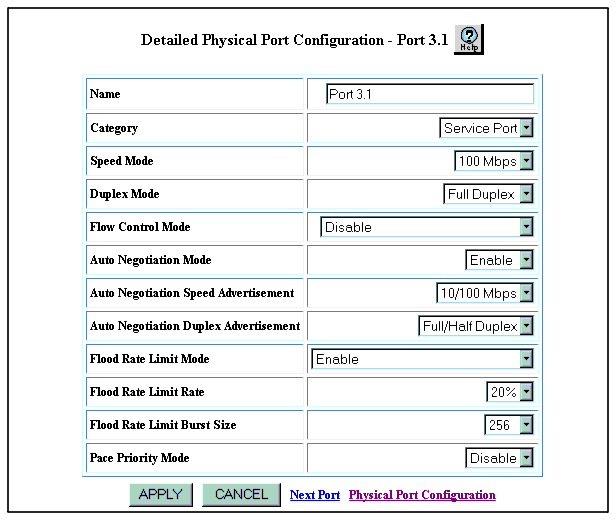
The Detailed Physical Port Configuration Web page for that port is displayed. See Figure�72.
Figure�72:�Detailed Physical Port Configuration Web Page for Fast Ethernet Port

- Enter a port name in the Name field, if desired or use the default name.
- Select one of the following in the Category field:
- User Port if this is an end-station port
- Service Port if this is a trunk port.
- Select a speed (10 Mb/s or 100 Mb/s) from the Speed Mode field pull down menu, If you want to set the port speed manually. If you want the port to autonegotiate, you can ignore this field.
Note: This feature is only available for 10/100 TX modules.
- Select a duplex mode (half-duplex or full-duplex) in the Duplex Mode field if you want to manually set the port's duplex mode. You do not have to select a duplex mode if you set the port to autonegotiate.
- In the Flow Control Mode field, select one of the following options:
Enable - Sets the port to both send and receive pause signals. This setting prevents buffer overflows on both local and remote port.
Disable - Sets the port to neither send or receive pause signals. Use this setting when flow control is causing congestion in other areas of the network.
Enable (with Aggressive Backoff) - Limits the size of flow control burst on TX and FX ports.
- Select Enable in the Auto Negotiation Mode field to enable Auto Negotiation.
Note: This feature is only available for 10/100 TX modules.
Auto Negotiation works best when the port or device on the other end of the connection is also set to Auto Negotiation. If you are having problems with Auto Negotiating connections, manually set the modes using the CLI.
- Select a speed from the Auto Negotiation Speed Advertisement pull- down menu. The options are 10Mbps, 100Mbps. or 10/100Mbps.
- Select a duplex option in the Autonegotiation Duplex Advertisement field. The options are
Full/Half Duplex and Half Duplex).
Note: The Speed and Duplex features are only available for 10/100 TX modules.
The switch sends the Speed and Duplex advertisement values to the device on the other end of the connection at the start of the auto-negotiating process. In general, the defaults are best, but there may be situations when you want to fix one setting, but allow the other setting to auto-negotiate.
- Select one of the following in the Flood Rate Limit Mode field:
Enable - If you want this port to limit the number of unknown unicast and multicast (flooded) packets it tries to forward
Disable - If you do not want this port to limit the number of unknown unicast and multicast packets it tried to forward
Enable (include Known Multicasts) - If you want to optionally include known multicast packets in this percentage to further decrease the possibility of the port's output buffer being overwhelmed.
- Select the percentage of a port's traffic that can be unknown unicast and broadcast packets in the Flood Rate Limit Rate field.
Note: Set this value lower if the port is having overflow problems.
- Open the Flood Rate Limit Burst Size pull down menu.
- Select a packet limit for the number of packets allowed in a single burst. The values are 1 to 2048.
Note: Set this value lower than 1024 (the output buffer's capacity) for Fast Ethernet ports. Also set this value lower if the port is experiencing overflow problems.
- Select Enable in the Pace Priority Mode field if you want this port to recognize and use 3Com's PACE priority mechanism.
- Click APPLY to save your changes, or CANCEL to restore previous settings.
Table�48 describes in detail the Fast Ethernet port parameters:
Table�48:� Detailed Physical Port Parameters for Fast Ethernet Ports �
| Parameter |
Description |
| Name |
Enter a user configurable name for this port (possibly a drop connection name or the name of the station or other device connected to the port). |
| Category |
Select either User Port or Service Port.
- The User Port is intended for use with switch connections to end user nodes.
- The Service Port is intended for use with switch connections to servers or other switches. The Service Port allows the switch to generate both log messages and alarm messages (traps). The User Port only generates log messages, preventing your network management station from being overwhelmed by port up/down messages that result from users turning workstations on and off.
|
| Speed Mode |
Select the speed of the port manually (to either 10 or 100 Mb/s). If auto-negotiation is enabled, this setting is ignored. |
| Duplex Mode |
Select the port duplex mode (half- or full-duplex). If auto-negotiation is enabled, this setting is ignored. |
| Flow Control Mode |
Determines if flow control is used on this port. For half-duplex links, active backpressure jams the sending Ethernet channel until the port's buffers can receive more packets. This prevents lost or dropped packets. For full-duplex links, IEEE 802.3z pause control allows the port to stop a sending station from sending more packets if the receiving port's buffers are full. For TX and FX ports, there is an additional option for Enable with Aggressive Backoff. This option limits the size of the bursts. Flow Control is recommended for use primarily on end-station connections. Using this flow control on trunk ports can cause unnecessary congestion on the network. |
| Auto Negotiation Mode |
Select the port to auto-negotiate a speed and duplex mode. Auto-negotiate works best when the connection on the other end of the link is set to auto-negotiate as well. If you set a port to auto-negotiate, and the connection is not successful, set the port speed and duplex mode manually. |
| Auto Negotiation Speed Advertisement |
Determines what information the port advertises when it starts auto-negotiating. In most cases, 10/100 are the best settings, but there may be cases when you want to auto-negotiate one parameter, while keeping the other fixed. |
| Auto Negotiation Duplex Advertisement |
Determines what information the port advertises when it starts auto-negotiating. In most cases, Half/Full are the best settings, but there may be cases when you want to auto-negotiate one parameter, while keeping the other fixed. |
| Flood Rate Limit Mode |
Prevents the switch from overwhelming the output buffer on lower-speed ports by placing a threshold on the percentage of port traffic that can be flooded packets (unknown unicasts and multicasts). You can also optionally include known multicast packets in this percentage to further decrease the possibility of the port's output buffer that is being overwhelmed. |
| Flood Rate Limit Rate |
Determines the percentage of a port's forwarded traffic that can be unknown unicast and multicast (flooded). Lower this value if the port has overflow problems. |
| Flood Rate Limit Burst Size |
Enter a value for the limit of packets allowed in a single burst. Accepted values are 1 to 2048. For Fast Ethernet ports, set this value lower than 1024 (output buffer capacity). Lower this value if the port has overflow problems. |
| Port PACE Priority |
Select Enable to allow the port to detect 3Com's proprietary PACE format as packets pass through the port. PACE allows a packet's priority (higher priority packets move through the switch before lower priority packets) to be set at the adapter. |
|

|

|

