Replacing the S8300 Media Server
Circumstances under which it is necessary to replace the S8300 Media Server can include:
- A functional failure on the S8300 board
- A functional failure of the S8300 hard drive
- Replacing an existing S8300 or its hard drive with newer technology
This section describes the following topics:
Backups and Restorations
A backup of the system should be performed before the replacement, if possible. Regularly scheduled backups of the system should have been performed as part of ongoing preventative maintenance.
If the original version of Communication Manager running on the system was Version 1.3 or later, the S8300 system backup should include the following file sets:
- Translation files (not for an LSP)
Note: An LSP receives its translations from the primary server.
- System and server files
- Security files (includes the authentication file but not the license file)
The license file must be treated differently. It can be copied from its location in the S8300 /etc/opt/ecs directory to the /var/home/ftp directory, and then transferred via FTP to a safe location on the customer's LAN. Alternatively, a new license file can be generated specifically for the replacement procedure.
When these files are restored later, it is only necessary to step through the Configure Server screens on the Web interface, clicking Continue, to read these data into memory.
If the original version of Communication Manager was 1.2 or earlier, the only files sets that should be restored from the S8300 system backup are:
- Translations files (not for an LSP)
- Security files
Manually record the system and server administration information from the Configure Server screens at the time of backup, so that these data can be re-entered on the Configure Server screens again when the translation files and security files are restored later. Table 48 summarizes these requirements.
Table 48. Backup and Restore Requirements
| Communication
Manager Version |
Backup
Files |
Restore
Files |
Configure
Server Screens |
| 1.3 or Later |
Translations (not for an LSP)
System & Server
Security |
Translations (not for an LSP)
System & Server
Security |
Click Continue,
each screen |
| 1.2 or Earlier |
Translations (not for an LSP)
Security |
Translations (not for an LSP)
Security |
Manually Reenter
Admin. Data |
|
|
|
|
Server Shutdown Operations
Depending upon the circumstances of the replacement, different server shutdown operations may be required:
- If you are replacing an active S8300 Media Server, a functional but inactive LSP, or a functional hard drive, you can use the Web interface to shut down the server:
- Under Server, click Shutdown This Server.
- On the Shutdown This Server screen, system restart checkboxes include:
- Delayed (default option) - the system waits for processes to close files and other clean-up activities to finish before the server is shut down
- Immediate - the system does not wait for processes to terminate normally before it shuts the server down
- Accept the default option.
- Leave the checkbox After Shutdown, Restart System unchecked.
- Click Shutdown.
- Alternatively, you can manually initiate a shutdown process by first depressing for at least two seconds the button located next to the fourth GREEN "Ok-to-Remove" LED (specific to the S8300).
- For Communication Manager versions 1.2 and earlier, the fourth GREEN "Ok-to-Remove" LED flashes at a constant rate until it finally glows steadily.
- For Communication Manager version 1.3 and later, the fourth GREEN "Ok-to-Remove" LED flashes at a constant rate, and the TST LED flashes slowly at first. As computer processes exit, the TST LED flashes faster. When the shutdown has completed, the TST LED goes out, and the "OK to Remove" LED then glows steadily.
Once steady, this GREEN "Ok-to-Remove" LED indicates that the disk drive has been parked properly and the S8300 is ready to be removed.
- If a non-functional S8300, LSP, or hard drive is to be replaced, normal shutdown procedures may not succeed.
Note: The two processes described in this case apply to Communication Manager version 1.3 and later.
When pressed, the shutdown button programs the S8300 hardware watchdog to reset the module after a two minute fail-safe interval. In addition, recovery measures are taken if the shutdown has not been accomplished within 80 seconds. These recovery measures store diagnostic information in flash memory on the S8300 for later analysis. The LED sequence is different according to the following circumstances:
- Shutdown Failure with Successful Recovery - If a high priority process has seized control of the S8300's processor, the shutdown signal may be held up indefinitely, so that a shutdown will never proceed. After 80 seconds, a recovery function runs within the S8300's operating system that equalizes process priorities, allowing the shutdown sequence to proceed. The LED sequence is as follows:
- After the shutdown button is pressed and held for at least two seconds, the "OK to Remove" LED begins to flash at a constant rate. The TST LED flashes slowly at first.
- The TST LED remains flashing at a slow rate for 80 seconds, because shutdown processing is being blocked by runaway processes. After 80 seconds, the YELLOW ACT LED is illuminated, indicating that process priorities have been equalized, and that diagnostic information has been saved for later analysis.
- Now allowed to proceed, processes begin to exit as the shutdown begins. As processes exit, the TST LED flashes faster, and the YELLOW ACT LED remains illuminated.
- When shutdown has completed, the TST LED goes out, and the "OK to Remove" LED comes on steady. At this point, it is safe to remove the S8300 module from the G700.
- Complete Shutdown Failure - If an operating system level failure has occurred, it is possible that the processor will never be yielded for the shutdown to begin, even after process priorities are equalized by the recovery function at the 80 second interval. After two minutes, the S8300 will be reset by the hardware watchdog. The LED sequence is as follows:
- After the shutdown button is pressed and held for at least two seconds, the "OK to Remove" LED begins to flash at a constant rate. The TST LED flashes slowly at first.
- The TST LED remains flashing at a slow rate for 80 seconds, because shutdown processing is being blocked by runaway processes. After 80 seconds, The YELLOW ACT LED is illuminated, indicating that process priorities have been equalized, and that diagnostic information has been saved for later analysis.
- Despite the process re-prioritization, the shutdown is still blocked, and the TST LED continues to flash at a slow rate. After two minutes, the hardware watchdog resets the S8300. At this point, the RED ALM LED is illuminated and all others go out. Although this begins restarting the S8300, it will be safe to remove the S8300 module from the G700 for approximately 15 seconds after the module resets.
Removing the S8300 Media Server
The S8300 Media Server contains a Lithium/Manganese Dioxide battery.
CAUTION: Risk of explosion if battery is replaced by an incorrect type. Dispose of used batteries according to the instructions.
Note: The S8300 Media Server is inserted into the G700 Slot V1, whether it is the primary server or a Local Survivable Processor (LSP). The S8300 can only be inserted in Slot V1 on the left side of the G700. The LED module must be pulled from its housing to provide clearance for the S8300.
To remove the S8300 Media Server:
Begin _____________________
CAUTION: Be sure to wear a properly grounded ESD wrist strap when handling the S8300 circuit board, hard drive, and CWY1. Place all components on a grounded, static-free surface when working on them. When picking up the hard drive, be sure to hold it only on the edges -- do not touch the bottom of the hard drive.
- Shutdown the S8300 Media Server using either the Web interface or the manual Shutdown button on the S8300 faceplate (Server Shutdown Operations).
- Loosen the two captive screws on the S8300.
- Disengage the LED module and remove it from the G700.
- Disengage and remove the S8300 from the G700.
End _______________________
Replacing the S8300 Hard Drive
If you are replacing the entire S8300 board, proceed to Reinserting the S8300 Media Server.
To replace the S8300 hard drive, perform the following steps (Refer to Figure 1):
Begin _____________________
- Unscrew the four screws on the bottom of the S8300 board that attach to the hard drive standoffs.
- Remove the hard drive ribbon cable (which is attached to the S8300 board) from the hard drive.
- If the replacement hard drive does not include them, unscrew the four standoffs from the threaded holes on the bottom of the old hard drive, and screw them into the threaded holes on the bottom of the replacement hard drive.
CAUTION: In Step 4, be careful not to bend the pins on the hard drive. Leave the four jumper pins to the right of the ribbon cable open and unconnected, as shown in Figure 1.
- Connect the open end of the hard drive ribbon cable (which is attached to the S8300 board) to the hard drive, as shown in Figure 1. Connect pin number one to the end of the ribbon connector marked with the red stripe.
- Place the hard drive on the S8300 board with the standoffs aligned with the screw holes.
- Hold the S8300 board on its side, with the hard drive in place, and screw the four screws through the bottom of the S8300 board into the hard drive standoffs.
Figure 1. S8300 Hard Drive Replacement
Reinserting the S8300 Media Server
To reinsert the S8300 Media Server into the G700
Begin _____________________
Note: If the optional CWY1 hardware is attached to the S8300 board, the LED panel (above slot v1) must be removed and reinserted together with the S8300 board.
- Insert the S8300 into slot v1 of the G700 (Refer to Figure 2).
- With the optional CWY1 and hard drive attached to the S8300 board, insert both the LED panel and S8300 board about 1/3 of the way into the guides (the guides are in slot v1 for the S8300 and above slot v1 for the LED panel).
- Push both boards (together) back into the guides, gently and firmly, until the front of each board aligns with the front of the G700.
- Secure the S8300 faceplate with the thumb screws (Refer to Figure 3). Tighten the thumb screws with a screw driver.
End _______________________
Figure 2. Align the LED module and the S8300 Media Server/LSP
WARNING:
To prevent access to electrical hazards by unauthorized personnel and to ensure continued compliance to international radiated emissions requirements, all captive screws must be securely tightened such that they cannot be loosened without the use of a tool.
Figure 3. Tighten Screws
End _______________________
Reconfigure the S8300 Media Server/LSP
At the conclusion of the procedure for replacing the S8300 Media Server, the S8300 must be reconfigured for service. Figure 4 shows several tasks for the G700/S8300 system solution, depending on operational and configuration factors. The letters in the following list correspond to the letters in Figure 4:
A. Determine whether the replacement S8300 requires an upgrade, or whether the system software requires an upgrade. Using the Web interface, view the version of Avaya Communication Manager on the replacement S8300, and compare it to the version that the system was running before the replacement. Possible outcomes are (Figure 4):
- Versions identical - No upgrade required (May require patch)
- Versions different - Upgrade required (May include patch)
B. For the case of no required upgrade, if regularly scheduled backups had been administered for the system (Figure 4):
- Install Communication Manager patch, if necessary.
- Use the Web interface to restore backup files (according to Table 48).
- Re-install the license file that had been saved on the customer's LAN (or install a new one).
- Execute a reset system 4 command to read translations.
- Backup system and end procedure.
If no backup exists, proceed with Installation Procedures for a New S8300 Media Server (G, Figure 4).
C. For the case in which an upgrade is required, two possibilities arise (Figure 4):
- If the server that was replaced had received regular upgrades and now has a newer version of Communication Manager, the replacement S8300 requires an upgrade. Upgrading the replacement S8300 does not require the installation of a new licence file, because the current license file reflects the newer version of Communication Manager.
- The replacement S8300 may have been upgraded to a newer version of Communication Manager. In this case, if the upgrade involves a new release of Communication Manager (for example, 1.2 to 2.0), a new license file must be obtained and installed (D, Figure 4).
E. If no regularly scheduled backup exists, proceed with Installation Procedures for a New S8300 Media Server (G, Figure 4). As part of those procedures, performing a necessary upgrade/patch is covered (Figure 4).
F. For the case in which regularly scheduled backups do exist (Figure 4):
- Use the Web interface to perform the upgrade.
- Install Communication Manager patch, if necessary.
- Restore backup files (according to Table 48)
- Re-install the license file that had been saved on the customer's LAN (or install a new one)
- Step through the Configure Server screens to populate the restored data (as indicated in Table 48).
G. Installation procedures for a new G700/S8300 are described in detail in Chapter 3, "Configuring a New G700 with an S8300 (Primary Controller or Local Survivable Processor)", in "Installation and Upgrades for the Avaya G700 Media Gateway controlled by an Avaya S8300 or S8700 Media Server, 555-234-100". If an upgrade is necessary, these procedures are described in detail in Chapter 5 of the same source (Figure 4).
H. If the configuration has no messaging application, perform another system backup (M, Figure 4) before concluding (Figure 4).
I. If the configuration has a messaging application, install this application. Messaging can be embedded IA770 INTUITY AUDIX�, INTUITY AUDIX� LX, or another messaging application (Figure 4).
J. For information on installing the IA770 INTUITY AUDIX Messaging Application, refer to "IA770 INTUITY AUDIX� Messaging Application, 555-233-825" on the Avaya S8300 and S8700 Media Server Library CD, or go to http://www.avaya.com/support, select Communications Systems, then Product Documentation; then, under Enterprise Class IP Solutions, select Avaya G700 Media Gateway and S8300 Media Server. Finally, search for IA770 INTUITY AUDIX documentation updates (Figure 4).
K. For information on installing the INTUITY AUDIX LX messaging application, refer to "INTUITY AUDIX� LX LAN Integration with S8300 and DEFINITY� Systems" on the Avaya S8300 and S8700 Media Server Library CD (Figure 4).
L. If another messaging application is used, follow the installation instructions applicable for that application (Figure 4).
M. Before concluding, perform another system backup (Figure 4).
Figure 4. 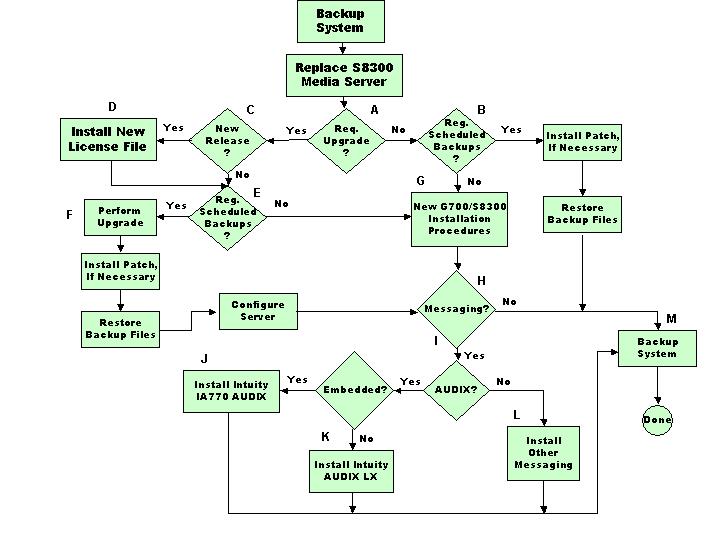
S8300 Media Server Replacement Flowchart