This article provides information on how to setup the Polycom OBi302 ATA [Analogue Terminal Adaptor] using assisted provisioning.
The information assumes that a user has been configured with an existing phone and that phone is to be changed to a Polycom OBi302
Important: For successful assisted provisioning with Avaya Cloud Office the device must be unlocked from any another provider. If locked, contact the other provider to determine if the phone can be unlocked
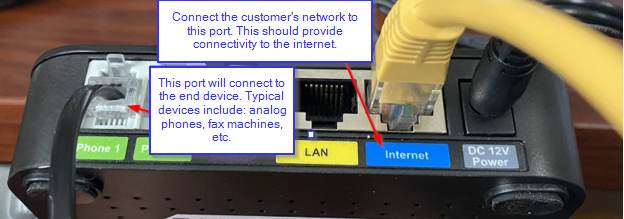
**Note - When physically connecting the ATA to the customer network you must plug into "Internet" Ethernet port"
Instructions;
1. As a system Administrator, navigate to https://service.cloudoffice.avaya.com/
2. Log into your account by entering your email address or user assigned phone number, followed by your password.
3. Go to Phone System > Phones & Devices > User Phones (or Common Area Phones if this device will be connected to a Limited Extension)
4. Locate the current phone which is to be changed, then click Change Phone. A new pop-up window will be shown
5. Select Bring Your own Device and click Next
6. Select or confirm the correct Emergency Address, then click Next
Important: The Emergency Address is used by emergency responders, ensure the address is correct and the location where the phone will be used.
7. In the search field, type OBI and select OBi302 ATA from the list . Click Next
8. Follow the instructions shown to obtain the IP address, MAC address, and resetting the device to defaults
Note: After the factory reset you may need to contain the IP address again as it may have changed
9. Enter the MAC address and click Next - a 2nd instruction page will be shown
10 . Follow the instructions for entering the provisioning server, take care with the details as the exact text must be used
For reference, the Provisioning Server url is: https://pp.ringcentral.com/obi/0.xml
As the device reboots, it is likely the device firmware will be updated, allow additional time for this to occur, it is important to keep the device powered during the firmware update.
Note: When attempting to access with device's web GUI, the browser may show "The requested URL was not found!" This is most likely due to the WAN access being disabled.
WAN access can be enabled again by using a phone connected to the device and dialing as follows;
- Dial ***0
- Enter 30#
- Press 1 to enter a New Value
- Press 1# to enable
- Press 1 to save
(NOTE: Please wait for the prompt to complete before entering the next set of digits)
Note: After configuring the device, the provisioning server configuration will be updated to include the MAC address of the device.
Important Note: When using an ATA to connect a plain paper fax machine the phone number assigned to the ATA user must be set to "Voice only" not Fax.
If all the above has been completed and assistance in troubleshooting items is needed please click here
Polycom OBi302 Related Articles: