• System requirements: 4GB+ RAM.
• Download the linux tar file – nqcsatellite.tar (See below under the attachments section of this doc)
NOTE: If you receive an error when clicking the above link please copy and paste the link into a browser.
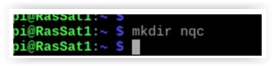
• Create a directory for the satellite installation: mkdir nqc
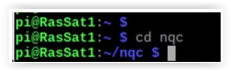
• Change directory location to directory and put the tar file in directory with the mv or cp command: cd nqc
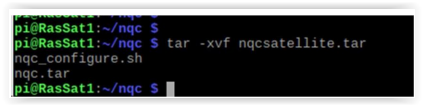
• Un-tar the nqcsatellite.tar file: tar -xvf nqcsatellite.tar
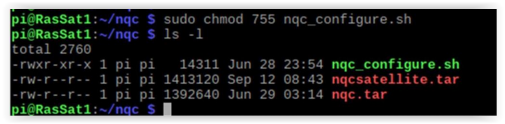
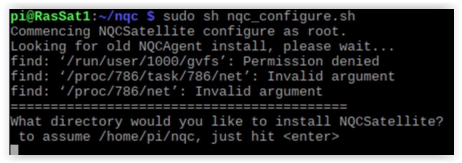
• Make the install script executable with the chmod command: sudo chmod 755 nqc_configure.sh
• Execute the nqc_configure.sh command with sh and accept the default installation directory: sudo sh nqc_configure.sh
• Install as a Satellite by typing “S”
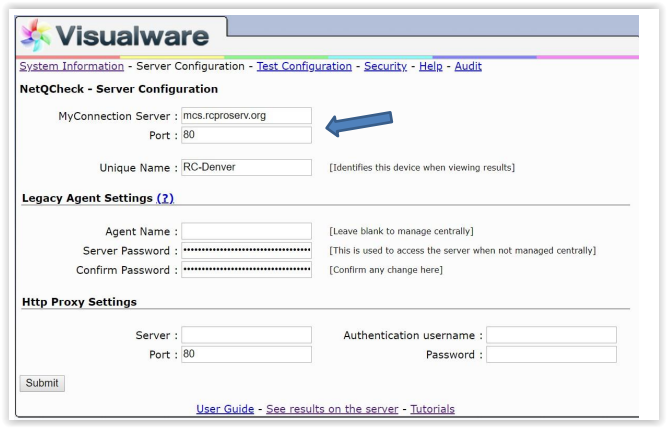
• Set the MyConnecton Server (MCS) URL to mcs.rcproserv.org
• Use the default port 80 for the MCS Port
• Accept the default Satellite Web port 8080
o Enter a friendly name for the Satellite, Customer Name-Site Location: i.e. AV_CompanyName_SiteLocation <- PUT IN YOUR COMPANY NAME and LOCATION
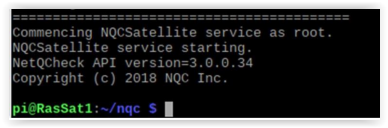
• Answer “y” to run automatically on restart
• Installation has finished, and the Satellite will be running
Table of Satellites
|
nnn – Site Name
|
xxx.xxx.xxx.xxx – IP address of Satellite
|
|
SJC – San Jose, CA
|
208.87.41.26 and 208.87.41.27
|
|
IAD – Vienna, VA
|
208.87.40.50 and 208.87.40.51
|
|
ORD – Chicago, IL
|
TBA
|
|
AMS – Amsterdam
|
185.23.248.147 and 185.23.248.148
|
|
ZRH – Zurich
|
185.23.250.147 and 185.23.250.148
|
|
SIN – Singapore
|
103.44.68.21 and 103.44.68.22
|
|
NRT – Tokoyo
|
103.44.59.40 and 103.44.59.41
|
|
GIG – Rio de Janeiro
|
104.245.58.21 and 104.245.58.22
|
Troubleshooting
• Click on “Server Configuration”
o Check “MyConnection Server” and “Unique Name” is how you entered during installation. “Port” = 80
o If any are wrong, uninstall the client and re-install to correct
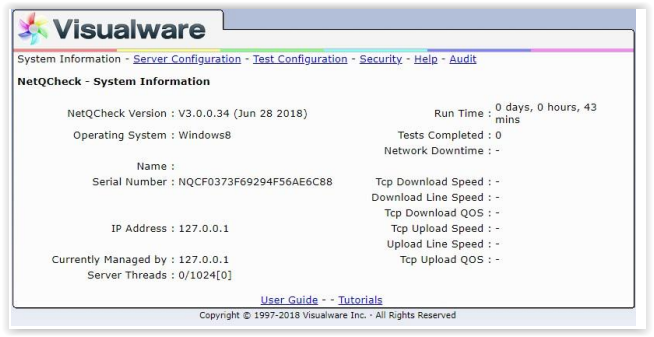
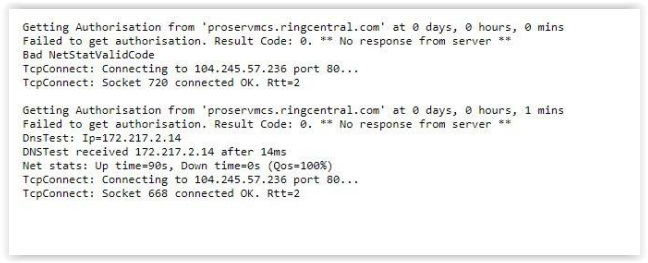
• Click on “Audit” and check for errors, IE:
Firewall Configuration (iptables) to mark packets with DSCP EF
sudo iptables -t mangle -A OUTPUT --destination {rc supernets} -j DSCP --set-dscp-class EF
Execute the following commands from a terminal session:
sudo iptables -t mangle -A OUTPUT --destination 80.81.128.0/20 -j DSCP
--set-dscp-class EF
sudo iptables -t mangle -A OUTPUT --destination 103.44.68.0/22 -j DSCP
--set-dscp-class EF
sudo iptables -t mangle -A OUTPUT --destination 104.245.56.0/21 -j DSCP --set-dscp-class EF
sudo iptables -t mangle -A OUTPUT --destination 185.23.248.0/22 -j DSCP --set-dscp-class EF
sudo iptables -t mangle -A OUTPUT --destination 192.209.24.0/21 -j DSCP --set-dscp-class EF
sudo iptables -t mangle -A OUTPUT --destination 199.68.212.0/22 -j DSCP --set-dscp-class EF
sudo iptables -t mangle -A OUTPUT --destination 199.255.120.0/22 -j DSCP --set-dscp-class EF
sudo iptables -t mangle -A OUTPUT --destination 208.87.40.0/22 -j DSCP
--set-dscp-class EF
** iptables-persistent is a package to write out changes to iptables **
apt-get install iptables-persistent
*** answer yes to save the tables when installing iptables-persistent **
If rules change then after install of iptables-persistent
sudo iptables-save > /etc/iptables/rules.v4 ** writes out /etc/iptables/rules.v4 for iptables configuration
Verify by doing the following:
sudo iptables -t mangle -L -v