Install Earthquake Protection for MCC
Return to Task List
Use the correct procedure for your installation:
Install Concrete Floor Mounting
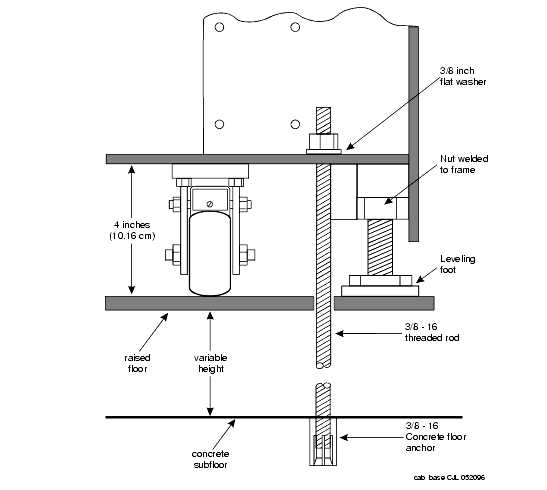
Install Raised Computer Floor Mounting
Install Concrete Floor Mounting
- Position the cabinet in the exact position it is to occupy when the installation is complete.
- Insert a pencil or marker through the holes previously occupied by the carriage bolts (front and rear) in the bottom of the cabinet and mark the floor directly beneath each hole.
- Roll the cabinet out of the way and drill four 1/2-in. (1.27 cm) diameter holes about 1.5 in. (3.8 cm) deep at the locations marked in Step 2.
- Insert concrete floor anchors (STARR part number 3425) into the holes.
- Roll the cabinet back into place and align the cabinet holes over the concrete floor anchors.Adjust the leveling legs until the cabinet is level. See Earthquake Mounting -- Raised Computer Floor.
- Insert a long punch through the holes drilled in Step 3 and mark the concrete floor beneath the raised floor panels.
- Remove the raised floor panels in which the holes were drilled.
- Using 1/2-in. (1.3 cm) anchor bits, drill a hole at each of the locations marked in Step 4. Stop drilling when the mark on the side of the bit reaches the floor level.
- Insert a concrete floor anchor (STARR part number 3425) into the hole until the mark on the bit reaches floor level again. Snap the top of the anchor bit off. Repeat for the remaining holes.
- A 3/8-16 threaded rod is used to secure the cabinet to each concrete floor anchor. See Earthquake Mounting -- Raised Computer Floor.
Measure the distance from 1 of the anchors to the bottom of the cabinet. Add 1/2-in. (1.3 cm) to this measurement to allow the rod to be threaded into the floor anchor. Add an additional 1/2-in. (1.3 cm) to allow the rod to protrude up through the bottom of the cabinet. For example: if the distance from the floor anchor to the bottom of the cabinet is 10 in. (25 cm), cut the threaded rod 11 in. (27.9 cm) long.
- When all 4 threaded rods are cut, replace the raised floor panels removed in Step 5.
- Position the cabinet over the holes and adjust the leveling legs until the cabinet is level.
- Insert the threaded rods through the cabinet bottom and thread into the concrete floor anchors.
- Place a 3/8-in. flat washer onto each rod. Thread a 3/8-16 hex nut onto each rod and tighten securely.
- Repeat this procedure for each cabinet to be installed (including the Auxiliary Cabinet and the Stratum 3 Clock Cabinet, if required).
Earthquake Mounting -- Raised Computer Floor
Return to Task List