- Verify dial tone is present at each trunk circuit.
- Locate the circuit start selection switches (see 808A Emergency Transfer Panel).
These are the first 10 two-position switches on the left side of the Emergency Transfer Panel. They are used to set each of the five incoming trunk lines to either loop start or ground start. Two switches are used for each circuit; switches 1 and 2 are used for circuit 1, switches 3 and 4 are used for circuit 2, and so forth. See Trunk/Test Switches.
- For loop start, set the switches to the left. For ground start, set the switches to the right.
- Connect a 25-pair cable between the male RJ21 25-pair connector on the Emergency Transfer Panel and the yellow field of the Main Distribution Frame (MDF). Pin Assignments for 25-Pair Connector shows the pinouts.
- Make cross-connections for each emergency trunk/emergency station pair.
The 808A is connected to the Main Distribution Frame (MDF) by means of a B25A cable. Connections for Telephone Used for Emergency Transfer shows the connections at the trunk/auxiliary field for a telephone used only for emergency transfer.
Connections for Telephone Used for Emergency Transfer and as Normal Extension shows the connections at the trunk/auxiliary field for a telephone used for emergency transfer as well as a normal extension.
- On the trunk identification label at the bottom of the panel, record the trunk line, extension, and location for each circuit.
- To each voice terminal designated as an emergency terminal, attach a label identifying it as such. The labels are provided with the unit.
- Check the system for normal operation as follows:
- Place the test switch (switch 12) in NORMAL OPERATION.
- Ensure the power supply is providing -48 VDC at 80 mA maximum. The power LED should be ON.
- Check wiring connections.
- Verify there is dial tone on all emergency transfer sets.
If all of the above conditions are not met, remove the panel from service and replace it with a new panel.
- Check the system for transfer operation as follows:
- Place the test switch (switch 12) in the ACTIVATED position.
- The power LED should be OFF.
- Verify there is dial tone on all emergency transfer sets.
If all of the above conditions are not met, remove the panel from service and replace it with a new panel.
808A Emergency Transfer Panel
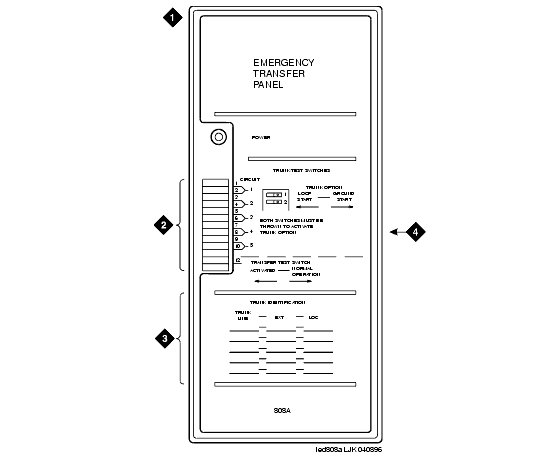
Figure Notes:
-
808A Emergency Transfer Panel
-
Circuit Start Selection Switches
-
Trunk Identification Label
- 25-Pair Male Connector
.
Connections for Telephone Used for Emergency Transfer
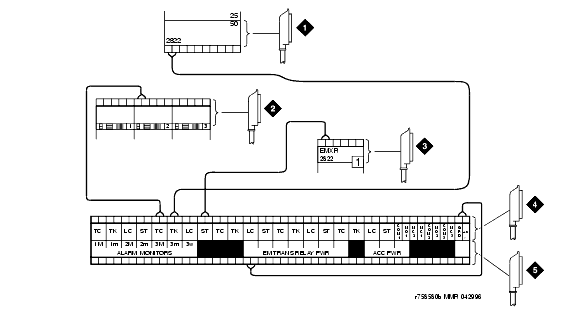
Figure Notes:
-
To Network Interface Circuitry
-
To TN747 (or Equivalent) Central Office Trunk Circuit Pack
-
To Blue or White Station Distribution Field
-
To Power Transfer Unit
-
To Control Carrier Auxiliary Connector
Connections for Telephone Used for Emergency Transfer and as Normal Extension
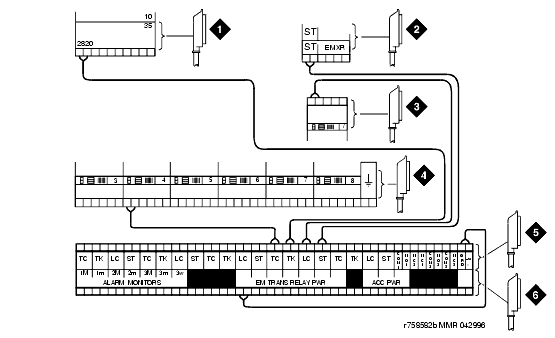
Figure Notes:
-
To Network Interface Facility
-
To Blue or White Station Distribution Field
- To TN2183 or Equivalent Analog Line Circuit Pack
-
To TN747 (or Equivalent) Central Office Trunk Circuit Pack
-
To Power Transfer Unit
-
To Control Carrier AUX Connector
Return to Task List