DEFINITY Made Easy Tools
Issue 2, November 2000
Install and Connect Single-Carrier Cabinets
Connect DC Power
Use the procedures in the following task list to connect DC power.
Task List: Connect the DC power
Making DC Power Connections
A 30 foot (9 m) cable connects to each cabinet. A special connector on one end of the cable is plugged into the cabinet power connector. The cable must be cut to length and terminated inside the J58890R DC Power Cabinet.
Each rectifier assembly can supply up to 50 Amps of DC current. A minimum of two rectifiers are installed in each DC Power Cabinet to supply a total of 100 Amps. A third rectifier assembly can be installed and is used as a backup (N+1). Each Single-Carrier Cabinet can pull up to 18 Amps. Up to three DC Power Cabinets can be stacked to supply power to Single-Carrier Cabinet stacks.
Typical DC Power Connections shows a typical power and ground layout for a DC-powered system without a J58890CG DC Power Distribution Unit. The J58890CG is required if the distance between the DC Power Cabinet(s) is greater than 30 feet (9 m). Connections Using DC Power Distribution Unit shows a typical power and ground layout for a DC-powered system containing a DC power distribution unit.
DC Power Connections with DC Distribution Unit
A 10 foot (3 meter) power cord is equipped with the appropriate connectors. In the configuration shown in Connections Using DC Power Distribution Unit, each cabinet stack has a DC Power Distribution Unit associated with it.
Stacking DC Power Cabinets
Up to three DC Power Cabinets can be stacked to supply power to Single-Carrier Cabinet stacks. See DC Power Cabinet Stack -- Rear.
Typical DC Power Connections
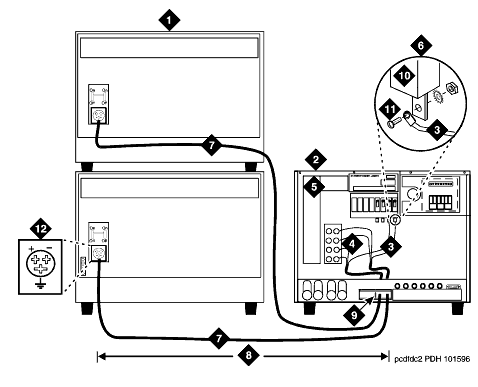
Figure Notes:
- System Cabinet Stack
- DC Power Cabinet
- White Wires
- Green Ground Wires and Black Wires Connect to the -48 VDC Return Bus
- -48 VDC Bus
- Connect White Wires to Circuit Breakers
- DC Power Cable (H600-436, G1) to Power Connector on Each Cabinet. Cut to Length and Crimp a Ring Terminal Onto Each Wire
- 30 Feet (9 m) Maximum
- Route Cables Through Sliding Door
- Circuit Breaker
- Supplied #10-32 Screw, #10 Star Washer, and #10-32 Hex Nut
- Inset Showing DC Power Connector (Male)
Connections Using DC Power Distribution Unit
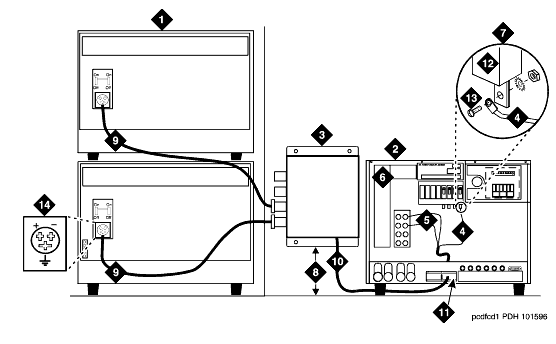
Figure Notes:
- System Cabinet Stack
- DC Power Cabinet
- DC Power Distribution Unit (position to right of the cabinet stack
- White Wire (connect to Circuit Breaker). See inset.
- Green Ground Wires and Black Wire (connect to the -48 VDC Return Bus)
- -48 VDC Bus
- Inset
- 12 inches (30.5 cm) from floor to DC Power Distribution Unit
- DC Power Cable to Power Connector on Each Cabinet.
- DC Power Distribution Unit Power Cord (route to rear of DC Power Cabinet)
- Route Power Cord Through Sliding Door
- Circuit Breaker
- Supplied #10-32 Screw, #10 Star Washer, and #10-32 Hex Nut
- Inset Showing DC Power Connector (Male)
DC Power Cabinet Stack -- Rear
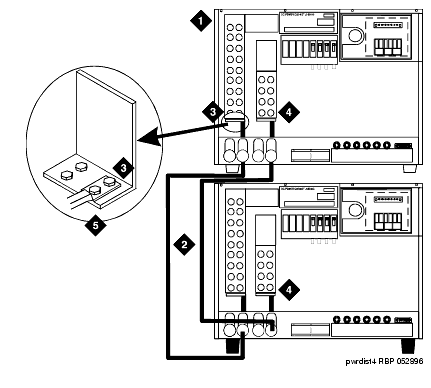
Figure Notes:
| Copyright� 2000 Avaya Inc |
| Send comments to MadeEasy Development Team |
| Always check at the Made Easy Web site for the most current information. |