DEFINITY Made Easy Tools
Issue 3, December 2001
Add IP Solutions
| Caution! | When adding or replacing any hardware, be sure to ground yourself against electrostatic discharge (ESD) by wearing a grounded wrist strap. |
| Note: |
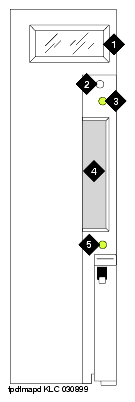
The circuit packs are hot-swappable, so you do not need to power down the carrier to install them. If you need to remove the TN802B IP Interface from the carrier at a later time, shut down Windows NT first by pressing the recessed reset button on the faceplate (see TN802B IP Interface faceplate) of the TN802B IP Interface until the LCD shows a flashing MSHUT *. When the flashing stops and the asterisk disappears (about 2 min), it is safe to remove the circuit pack. |
When you plug in the TN802B IP Interface, the circuit pack starts to boot and the LCD reads PC Boot. The circuit pack automatically reboots, and after about 3 to 4 minutes, the LCD changes to MEDPRO*.
If the TN802B is pre-administered at the factory, it reboots several times to initialize to MedPro mode.
| Note: |
For an initial installation, the TN802B IP Interface needs to be administered first. If the TN802B is not pre-administered, go to Administer the IP Interface. |
TN802B IP Interface faceplate
J58890MA-1 L30 IP Interface Assembly
| Copyright� 2001 Avaya Inc. |
| Send comments to MadeEasy Development Team |
| Always check at the Made Easy Web site for the most current information. |