- Insert the flash disk into the right most slot on the TN802B IP Interface. On the terminal, a dialog box assigns a drive letter; the default is (D:).
- Right click on
Start > Explore to open the Windows NT Explore pane and select the drive letter indicated in the previous step.
- Double-click on
Medpro and select the
Setup icon.
- Follow the Install Shield procedure to transfer all the necessary files to the TN802 IP Interface.
- In the Finish dialog box, select
I will restart later;
do not select
Restart computer.
This would be a good time to read the
Readme.txt file.
- Click on
Start > Settings > Control Panel > Services.
- Select
IP Trunk and click on
Startup.
Do not click on
Start.
- Under Startup Type, select
Disabled and click
OK to disable IP Trunk mode.
- Click
Start > Shut Down and select
Restart the computer?
or on the TN802 circuit pack:
Press the recessed reset button on the faceplate (see TN802B IP Interface faceplate) of the TN802B IP Interface until the LCD shows a flashing
MSHUT *. When the flashing stops and the asterisk disappears (about 2 min), reseat the circuit pack to restart the system.
or on the SAT:
- Type
busyout board
UUCSS and press
Enter.
- Type
reset board
UUCSS and press
Enter.
- Type
release board
UUCSS and press
Enter.
Once the system is completely initialized, the LCD reads
MEDPRO *.
- Affix the new TN802B label to the circuit pack.
- Disconnect the monitor, keyboard, and mouse.
TN802B IP Interface faceplate
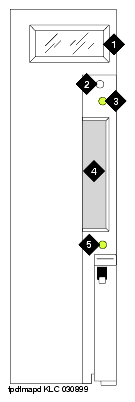
Figure Notes:
- LCD display
- Reset button (recessed)
- Red board status LED
- PCMCIA card slot
- Yellow PCMCIA disk-in-use LED
Return to Task List