Modular Messaging Help
|
Modular Messaging Help |
|
| Home > MAS Administration > MAS - CA - Example 2: Call Transfer Using Dial By Name |

|
MAS - CA - Example 2: Call Transfer Using Dial By Name |
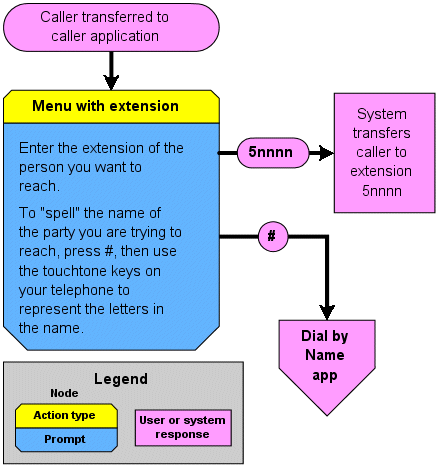
This example has been created to illustrate how you can use a caller application to allow callers to take advantage of the Dial by Name feature. This feature allows callers to “spell” the name of the party they are trying to reach, and the system automatically looks up and tries to match the number entered with a subscriber on the system.
Normally, it is not necessary to use a caller application to access the Dial by Name feature. In most cases, the system Automated Attendant can access Dial by Name directly by assigning any numeric key press to Directory.
However, in cases where you do not want to use the system Automated Attendant, you can still access the Dial by Name feature using caller applications.
The key is to use a Menu with extension or Menu with mailbox action type. In both these action types, the # key is reserved for the Dial by Name application.
This means that all you really have to do to make use of the Dial by Name feature with a caller application is create an application node with one of these two action types. You do not need to create a separate caller application to use Dial by Name.
The following is a possible call flow for this caller application. Note that this does not necessarily need to be an entire application by itself. In fact, it will more likely be used to best effect by simply creating an application node within an application (for instance, it could be used as an additional option in MAS - CA - Example 1: Alternative “Auto Attendant” Main Menu).
This example is intended primarily to illustrate how to set up the node. See .
The following procedure assumes that you have already started the Caller Applications Editor. It presents a step-by-step method for building the Example 2 caller application.
|
|