 |
Modular Messaging Help
|
|

|
MAS - CA - Example 1: Alternative “Auto Attendant” Main Menu
|
This example has been created to illustrate how you can use a caller application as an alternative to the system Automated Attendant. This caller application is designed to be the caller’s first contact with the system.
The Scenario
XYZ Company has operations throughout North America, including Mexico and French-speaking areas of Canada. For this reason, they want their callers to have the option to continue in either Spanish or French. However, they also want to:
- Allow callers to reach the intended party’s extension at any time by entering the subscriber’s extension.
- Use a custom prompt before the transfer if a caller chooses to transfer to the operator.
- Allow callers to reach the Technical Support department, with the call being automatically directed either to the Help Desk live extension (during business hours) or to the Tech Support voice mailbox (after business hours).
- Give callers the option to hear the menu again, using the 9 key.
Since the system Automated Attendant does not perform any of these options, and since they are not concerned about using the call blocking, call screening, and intercom paging features, XYZ has decided to disable the system Automated Attendant and use a custom one instead, in the form of a caller application.
Planning the Application
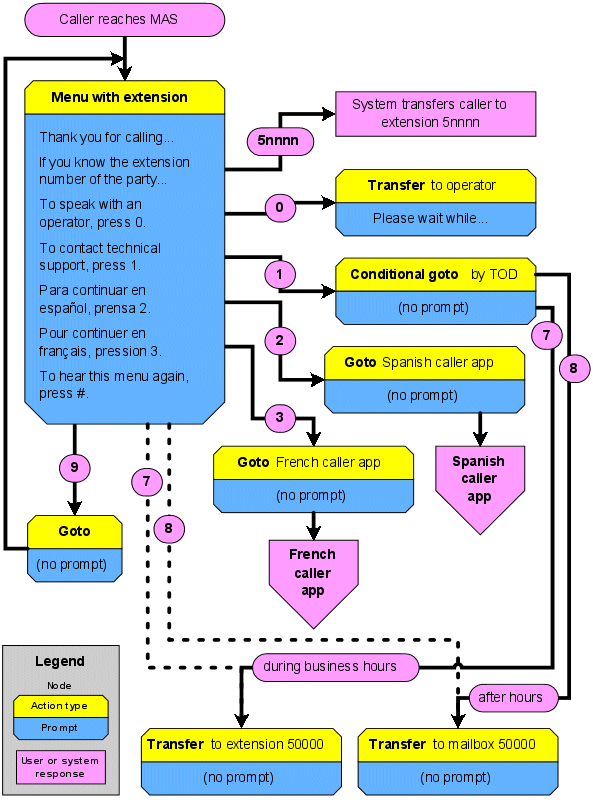
After discussing their business needs, XYZ Company devised the following caller application diagram. See .
Notes:
- The yellow areas (boldface) indicate what type of action is assigned to the node. The blue areas indicate what the prompt is to say (if anything). The pink areas indicate some action or response taken by either the caller or the MAS.
- The caller application base node is of action type Menu with extension. This allows callers to dial a subscriber’s extension number, which on XYZ Company’s system must have 5 as the first digit.
- The Conditional goto node routes the caller to the Tech Support Help Desk or voice mailbox, depending on what time the call comes in. To accomplish this, though, you must reserve two other key presses, in this case the 7 and the 8. These keys were chosen so as to minimize the likelihood of a caller pressing the wrong key and getting one of these options by mistake.
- The caller can reach the Technical Support help desk or voice mailbox directly by pressing 7 or 8, respectively, but you do not want to include that as an option in the main menu prompt. This is indicated by the dotted lines.
- The multi-language options (2 and 3) both exit this caller application to access other caller applications. XYZ Company planned these applications during the planning phase, but they are not shown here.
- Key presses of 4, 6, other multi-digit key press combinations that are not valid extensions or mailboxes will result in an “invalid response” prompt from the system.
|
Setting up the Targets
Before building the application, you must set up the following targets:
- Technical Support Help Desk extension number 50000.
- Technical Support voice mailbox number 50000.
- (Recommended, but not required) The Spanish language caller application.
- (Recommended, but not required) The French language caller application.
Building the Caller Application
The following procedure assumes that you have already started the Caller Applications Editor. It presents a step-by-step method for building the Example 1 caller application.
- Select Menu with extension as the Action type.
- Select Play entry prompt and then select Application prompt (Prompt tab).
- Add a prompt and enter “Welcome and Main Menu” under Comments.
|
Note:
You will not actually record the prompt at this point, you are merely creating a placeholder for it.
|
|
- Verify that the Application tab is set to use the Default operator, <Parent node> as the Default cancel setting, and the * key as the Default cancel key.
- Name it Transfer to operator.
- Select Transfer as the Action type.
- Select 0 for the Key press.
- Enter a brief Description for it.
- On the General tab, verify that Operator is selected.
- Select Play entry prompt and then select Application prompt.
- Add a prompt and enter “Please wait while I transfer you to the operator” under Comments.
|
Note:
You will not actually record the prompt at this point, you are merely creating a placeholder for it.
|
|
- Add another application (action) node to the base node. This node will be used by the Conditional goto node to transfer the caller to the Technical Support Help Desk during business hours.
- Name the node Transfer to Tech Support desk.
- Select Transfer as the Action type.
- Select 7 for the Key press.
- Provide a brief Description.
- Modify the application (action) node properties:
- On the General tab, verify that Extension is selected and set 50000 as the extension number.
- You do not need a prompt for this node, so verify that the Play entry prompt check box is cleared (Prompt tab).
- Add another application (action) node to the base node. This node will be used by the Conditional goto node to transfer the caller to the Technical Support voice mailbox after business hours.
- Name the node Transfer to Tech Support MB.
- Select Transfer as the Action type.
- Select 8 for the Key press.
- Provide a brief Description.
- Modify the application (action) node properties:
- On the General tab, verify that Mailbox is selected and set 50000 as the mailbox number.
- You do not need a prompt for this node, so verify that the Play entry prompt check box is cleared (Prompt tab).
- Add another application (action) node to the base node. This is the node that will actually transfer the caller to the appropriate Technical Support extension (during business hours) or voice mailbox (after business hours.
- Name the node Contact Technical Support.
- Select Conditional goto as the Action type.
- Select 1 for the Key press.
- Provide a brief Description.
- Modify the application (action) node properties:
- On the General tab, select node 7 as the During hours node.
- Select 8 as the After hours node.
- Because XYZ Company wants the help desk available only during regular business hours, click Weekly schedule... and set the schedule grid to be active Monday through Friday from 8:00 a.m. to 6:00 p.m.
You do not need a prompt for this node, so verify that the Play entry prompt check box is cleared (Prompt tab).
- Add another application (action) node to the base node. This node will exit this caller application and transfer the caller to the Spanish language caller application.
- Name the node Continue in Spanish.
- Select Goto as the Action type.
- Select 2 for the Key press.
- Provide a brief Description.
- Modify the application (action) node properties:
- On the General tab, verify that Caller application is selected.
- If you have created and deployed the Spanish caller application, you can select that caller application from the drop-down list. Otherwise, you will have to create and deploy the Spanish caller application before you can complete this node.
- You do not need a prompt for this node, so verify that the Play entry prompt check box is cleared (Prompt tab).
- Add another application (action) node to the base node. This node will exit this caller application and transfer the caller to the Spanish language caller application.
- Name the node Continue in French.
- Select Goto as the Action type.
- Select 3 for the Key press.
- Provide a brief Description.
- Modify the application (action) node properties:
- On the General tab, verify that Caller application is selected.
- If you have created and deployed the French caller application, you can select that caller application from the drop-down list. Otherwise, you will have to create and deploy the French caller application before you can complete this node.
- You do not need a prompt for this node, so verify that the Play entry prompt check box is cleared (Prompt tab).
- Add another application (action) node to the base node. This is the final node in this application, and its job is simply to redirect the caller back through this menu.
- Name the node Repeat this menu.
- Select Goto as the Action type.
- Select 9 for the Key press.
- Provide a brief Description.
- Modify the application (action) node properties:
- On the General tab, verify that Node is selected.
- From the drop-down box, select the caller application node for this caller application, Main Menu.
- You do not need a prompt for this node, so verify that the Play entry prompt check box is cleared (Prompt tab).
- Save the application, if you have not already done so.
Recording and Assigning the Prompts
Although XYZ Company has decided to have their prompts recorded professionally, you can record the prompts for test purposes. This caller application requires only two prompts, but the Main Menu prompt, especially, must be carefully scripted, so as to provide the options in the correct order and form. Avaya recommends that you write out all prompts before recording them, as this helps ensure that the prompts say exactly what you want them to say.
XYZ Company created the following script for the Main Menu prompt (numbered 1 in the application):
“Thank you for calling XYZ Company. We value your business, so please listen carefully to the following options.
“If you know the extension number of the party you are trying to reach, please enter it at any time.
“To speak to an operator, you can press 0 at any time.
“To reach Technical Support, please press 1.
“Para continuar en espa�ol, prensa 2.
“Pour continuer en fran�ais, pression 3.
“To hear this menu again, press 9.”
|
Note:
It is possible that you might want to present the options in a different order, but that is something you should decide during the planning phase. We recommend that you present the options in numerical order, and that this idea be central in your planning.
|
For the Transfer to Operator prompt, they created the following script:
“Please wait while I transfer you to the operator.”
While waiting for the prompts to be recorded by a professional studio, you can make your own temporary recordings. Once recorded, these prompts become part of the application. After recording the prompts, (prompt 1 and 2, respectively) verify that you have the correct prompt assigned to the appropriate node.
Later on, when the professionally recorded *.WAV files have been received, you can replace the existing prompt recordings with the new ones.
For more information, see MAS - CA - Procedure - Importing or Recording Application Prompts
Deploying the Caller Application
After saving the application again, you are ready to deploy the application.
For the procedure to do this, see MAS - CA - Procedure - Deploying Caller Applications to a VMD.
Analyzing the Application
Immediately after deploying the application across the voice mail domain, Avaya recommends that you analyze the application, which tests it for integrity and flags any errors it finds. This is a valuable tool for debugging your caller applications.
For the procedure to analyze the application, see MAS - CA - Procedure - Analyzing Deployed Caller Applications.
Top of page